Patriot Plink (Smart Phone App) - Patrol Response
The Patrol Response module adds additional features to the Plink smart phone
application, including Dispatch Jobs, Patrol Jobs, and Welfare Checks.
Overview
This module is intended to allow operators to send dispatch requests to
Patrol Guards who are equipped with the Plink smart phone App. The patrol guards can
then respond to the request and give feedback as they work through the job. Typically, the
Patrol Response module is used by a monitoring company who performs their own
response using their own internal patrols, or a dedicated dispatch company who
has their own patrol guards.
This document explains how to setup a Plink Patrol user and provides links to other relevant documentation such as how to make Patrol users show in response list for dispatch, how to dispatch a patrol as an operator and how to use the Plink App as a Patrol unit.
Prerequisites
- Standard Plink setup/configured. See the SmartPhone documentation for initial Plink
setup.
- Patrol Response module registered
- ICA version 6.7.17.1 or later
- Plink app version 4.0.0 or later
- (Optional) Dispatch module configured. This will also allow for dispatch
to External Dispatch Companies as well as Internal Dispatch to your own
patrol guards. See the Dispatch
documentation.
Contents
Plink Patrol Welfare account
Create the Patrol Users
Guard Tours - Scan Codes
Linking Patrols to Accounts
Dispatching Plink Patrols
More Information
Plink Patrols are set up as Users in Patriot.
A Plink Welfare account i required to be created if the Patrol will be performing welfare checks and using GPS tracking.
Template Setup
To begin create a new action plan, called "Welfare Check Overdue". This should be a
priority event. Use Action Plan Scheduled Actions to redirect to a non-priority
event while the site is closed.
this will determine if a welfare check signal generates an alarm for operator response
Now download and import the Welfare Event Type template
The 'Patriot Patrol Welfare Checks - Plink' is linked below.
Direct Link for Patriot Patrol Dispatch Welfare template
Patriot Patrol Welfare Checks - Plink Template
Import the template into Patriot using the import / merge function
Importing Templates
Ensure that the Welfare Check Overdue event (type 65002) is using the new "Welfare Check overdue" Action Plan you created.
Create the Welfare accounts
Create a new Welfare account for each Patrol/User
e.g
The Welfare account needs to have the following settings:
Type template: Needs to be set to the Patriot Patrol Welfare Checks - Plink template imported above.
No Signals Monitoring: Needs to be set to the
welfare check frequency (e.g. 30 minutes). If required, alter the reset time to
avoid extra events outside of the patrols active hours.
Schedules: An opening event is sent when the
patrol enables welfare checks, and a close event when they disable welfare
checks. Patrol hours and late to open/late to close can be set up if
required.
Mapping: If the mapping module is enabled, set
'Mobile Client' active on the client, so that location events will be
displayed.
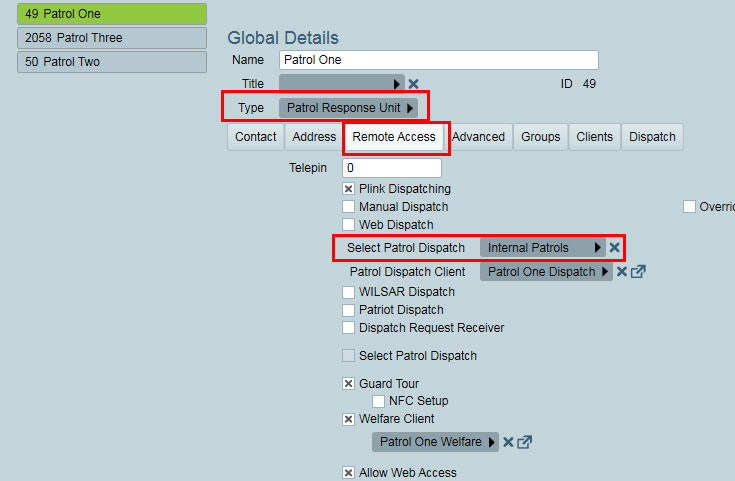
We will now create the Patrol Response Units and configure them.
Go to Maintenance-> Users-> User Maintenance
Create a new Patrol User and name it appropriately. This could be the name of the Patrol Response Vehicle. E.g "Patrol One", "Patrol Two"...
Go to the Remote Access Tab of the User and select "Plink Dispatch"
The Patrol user must also have ICA access configured, with a suitable username/password. The user only needs to be assigned read only level of access to ICA.
If you also have the Dispatch Module you can assign an Availability Account and select the 'Select Patrol' user.
For more information on setting up the Patrol Availability account and Select Patrol Dispatch User see the documentation below
Dispatch Module
For more information on setting up a internal Patrol configuration to link many Plink Patrol units to the correct accounts see the tutorial below. Dispatch Module Required.
Internal Patrols Tutorial
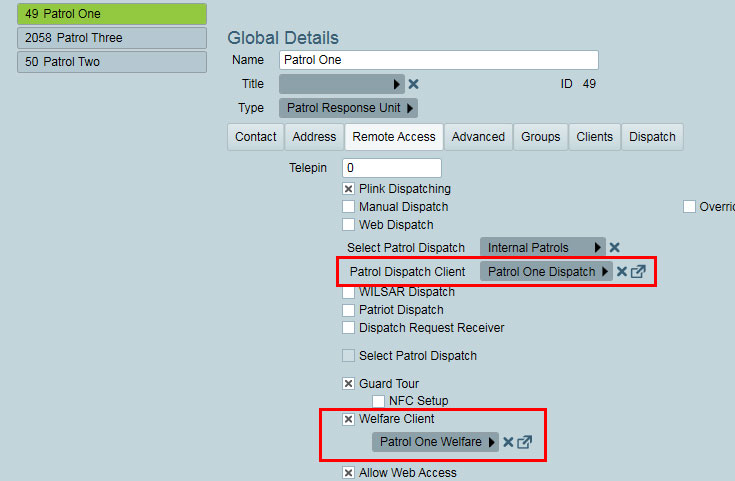
Assign Welfare Account to the Patrol User
Assign the Welfare account to the Patrol user from their User Maintenance, Remote Access tab
Once configured, the Patrol has the following options available in the Plink App:
Enable/Disable Location Tracking: Begins/ends
background location tracking. When this is enabled location signals will be
logged in Patriot every few minutes. If the device is either unable to obtain a
location or fails to log the location to the Patriot Server the Plink User is
notified.
Enable/Disable Welfare Checks: Begins/ends a
patrol shift, and starts/stops welfare check monitoring.
Send Welfare Check: Sends a welfare check to
the monitoring station, resetting the welfare check timeout.
Send Duress Alarm: Sends a duress/panic alarm
to the monitoring station, requesting immediate assistance. Dress alarms can be
sent via smart buttons, e.g. Flic button. See the Flic
iOS documentation for how to setup Flic on iOS to send duress alarms.
All actions taken are logged against the configured Patrol Users selected 'Welfare Client' account.
Welfare check and duress events and location tracking signals will include
the patrols location, which operators can view from the Mapping tab, if the
mapping module is registered.
Patriot zones can be configured with scan codes, which can be scanned by a
patrol during a guard tour.
Scan codes can be entered on a zone record, along with a desired scan
frequency.
A Scan Code Exceptions
Report is available to report on zones which have not been scanned at the
correct frequency.
The following signal types need to be added to the relevant templates:
65550: Patrol Guard Tour Scan
65551: Patrol Guard Tour Note
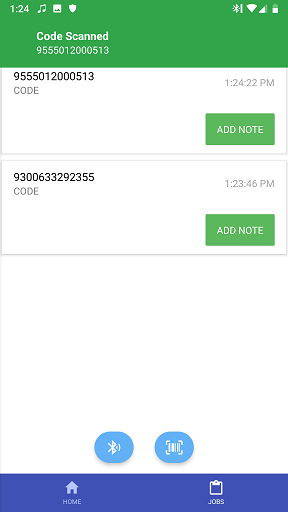
During the guard tour, the Patrol will be able to scan the pre-configured
codes to indicate that they have checked the surrounding area.
Notes can also be added after the scan process, to report additional
observations.
All actions taken are logged against the client associated with the scanned
zone. Unknown/invalid scan codes will be reported to SYST(1)-01.
The app supports the scanning of NFC tags and Data Matrix codes.
NFC Tags
NFC tags will be read whenever the phone is places within a short distance
of the tag. When a tag is read, the app will be automatically opened (if not
already), and the new tag read will be displayed on the Guard Tour page within
the app. To read an NFC tag, the phone must have support for NFC.
NFC Guard Tour
New NFC tags can also be written using the app. The User logged into the app
must have NFC Setup access, as specified from the Remote Access tab of the
user. From the Guard Tours page, select the NFC Setup button,

NFC Setup
Button
This will open the NFC Setup page. Enter the unique NFC Code into the Scan
Code field.
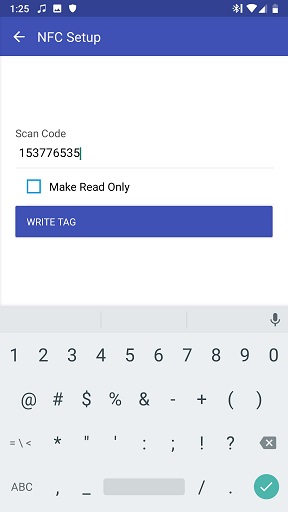
NFC
Setup
Compatible NFC Tags
Any blank tag which has had the data written to using the plink app, will be
compatible.
If the tags used have pre-written data by some other means, it gets a little
more complicated, as there as different formats for encoding the data. If the
data is written as a text record (NDef type of Text), which is a common format,
then we support this format. If you are going to purchase the tags from a
supplier, and get the data written to the tags as part of the purchase, then
make sure you specify the format as text. It would be a good idea to purchase a
small number first to ensure the format written is compatible with the app.
Data Matrix Codes
To read a Data Matrix Code, from the app select Guard Tour, then click the
Data Matrix Scan button,

Data Matrix Scan
This will open the camera to allow for the scan of the code. Place the code
within the guide box on the screen. The torch can also be turned on using the
torch button. Once turned on, it will default on the next time a scan is
made.
New Data Matrix stickers can be generated using this webpage within the
Patriot support portal, Data Matrix
Code Generator
Bluetooth Beacon
Plink supports scanning Bluetooth beacons. The scanning can be done in the
foreground or background. Below is an example for foreground scanning.
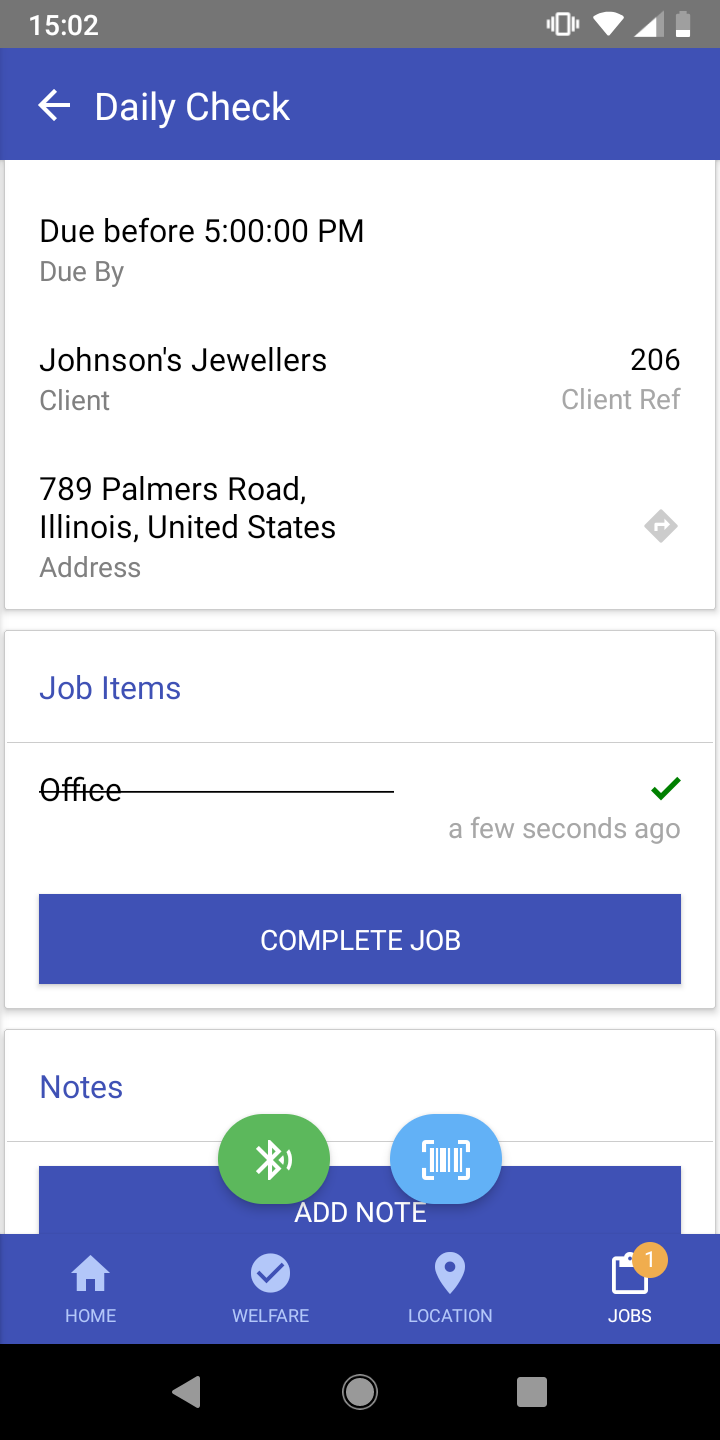
After a patrol job has been picked up, Plink can scan Bluetooth beacons in
the background, by enabling "Background Scanning" option. In background
scanning mode, Plink will automatically scan and complete the Job Items, the
patrol guard can leave the phone in his/her pocket and focus on inspecting the
site. Note: Although Plink can complete the Job Item for the
patrol guard, he/she still need to manually complete the Patrol Job.
Compatible Bluetooth Beacon
Bluetooth beacons with Eddystone or iBeacon protocol are supported by
Plink.
Configure Bluetooth Beacon
The way to configure the Bluetooth beacon may vary depending on the models.
Setting up the beacons is outside the scope of this document, please contact
the Bluetooth beacon's manufacturer for instructions. To enable Plink discovery
the beacon, the following detail must be used for when setting up the
beacon.
When using an Eddystone beacon, the namespace for the beacon has to be:
0x9AB119417D65E5984DE2.
Plink reads the field "InstanceID" in an Eddystone beacon as the scan code,
so put the scan code of the zone here. Note that "InstanceID" has a size limit
of 6 bytes, because of this, it is recommended to verify the scan code on the
beacon's set up first before entering the scan code in Patriot.
For iBeacon, the region ID has to be:
75DF1484-B72B-4FC0-937A-D05333021181.
Since data broadcast by an iBeacon split into 2 parts: Major and Minor, when
entering an iBeacon scan code in Patriot, please use the format of Major.Minor.
For example, if the Major value is "123" and the Minor value is "456", the scan
code entered to the zone should be "123.456".
Before you can dispatch a job or the Patrol can access their Digital Runsheet and Patrol Jobs they need to be linked to accounts.
For more information on setting up a internal Patrol configuration to link many Plink Patrol units to the correct accounts see the tutorial below. Dispatch Module Required.
Internal Patrols Tutorial
If you want to link just a few Plink Patrol units to sites/accounts without the Dispatch Module check out the Linking Patrols to Accounts tutorial below
Linking Patrols to Accounts Tutorial
 Once a plink patrol user is linked to an account they added to the response plan, the
operator now has the ability to dispatch activations to the Patrol from the activation response list. When the
activation is dispatched a notification will be sent to the patrol, who can
either accept or release the activation
Once a plink patrol user is linked to an account they added to the response plan, the
operator now has the ability to dispatch activations to the Patrol from the activation response list. When the
activation is dispatched a notification will be sent to the patrol, who can
either accept or release the activation
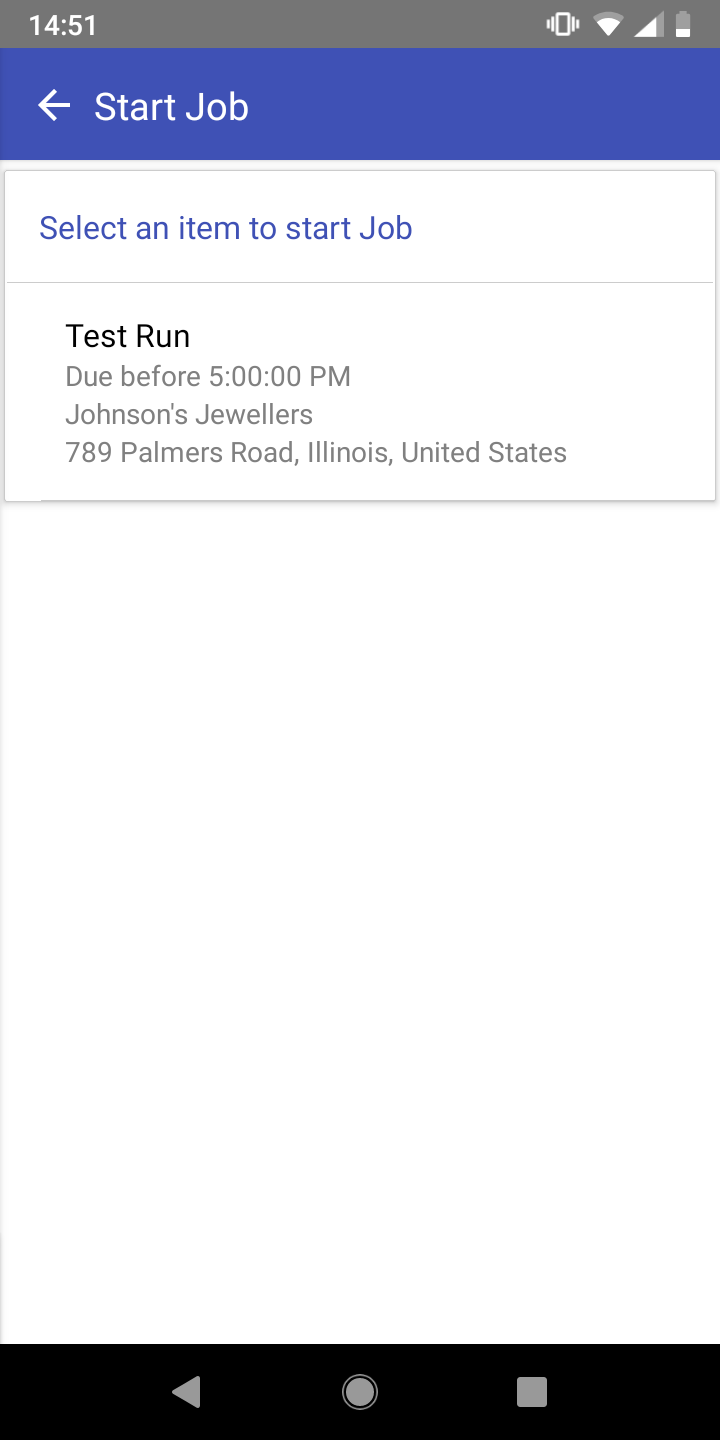
When selecting a pending patrol response job, the Patrol will see details of
the job, such as alarm details, site details, and instructions.
The patrol then has several options available during the response:
Accept: The patrol accepts the job, and will
travel to site to respond to the alarm.
Release: The patrol is unable to respond to
the alarm. This will notify the operator to re-assign the job to another
patrol.
On Site: The patrol has arrived on site.
Left Site: The patrol has completed their
response and has left the site. GPS location will be requested and transmitted
if obtained with the report.
Add Note: Allows the patrol to enter
additional response notes and observations. GPS location will be requested and
transmitted if obtained with the report.
If the patrol does not respond to the dispatch request within the Acceptance
Warning Time (set in the system wide response
settings) then a warning note will be logged against the dispatch job and
the operator will be notified.
All actions are transmitted back to the operator and recorded in the alarm
response.
 Plink reports that contain a GPS location will show the "Open in
map" button in the signal or note details.
Plink reports that contain a GPS location will show the "Open in
map" button in the signal or note details.
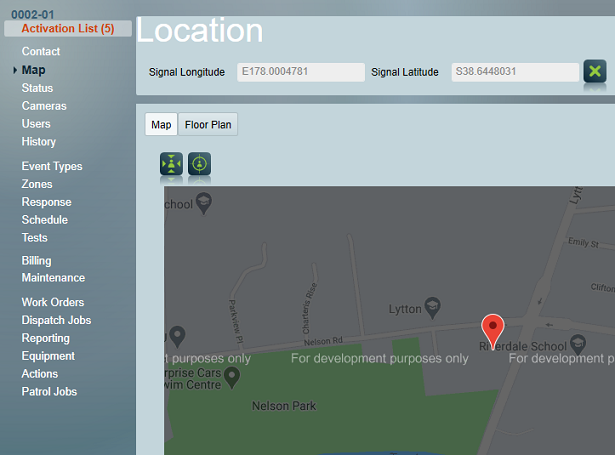
Viewing a Plink report in the map
Configuration
How to Link Patrols to Accounts without the dispatch Module.
Linking Patrols to Accounts
How to link many Plink Patrol units to the correct accounts using the Dispatch Module
Internal Patrols Tutorial
For more information on Dispatch such as setting up the Patrol Availability account and Select Patrol Dispatch User see the documentation below
Dispatch Modules
For setting up Scheduled Patrol Jobs - Digital Runsheets
Scheduled Job Setup
For information on creating the feedback forms required for Dispatch Jobs check the documentation here
Feedback Forms
Feedback Forms will require Dispatch Categories (Work Order Categories). Once Feedback Forms are created link them to Dispatch Categories as detailed here
Dispatch & Work Order Categories
Operation
Tutorial for Operators on how to dispatch and manage a Patrol Job
Dispatch a Job to a Patrol
For Plink Users:
For more information on how to receive and complete Patrol Dispatch Jobs in the Plink App click the link below
Plink Dispatch Jobs Tutorial
For more information on how to load a Digital Runsheet and complete Scheduled Site Check Jobs in the Plink App click the link below
Plink Digital Runsheet Jobs Tutorial
For more information on how to use the Welfare Checking and Duress functions in the Plink App click the link below
Plink Welfare Tutorial