In some cases this dispatch company will also be using a copy of patriot as their dispatch software. With the Patriot Dispatch feature, Patriot can send a dispatch request from one copy of the Patriot software to another.
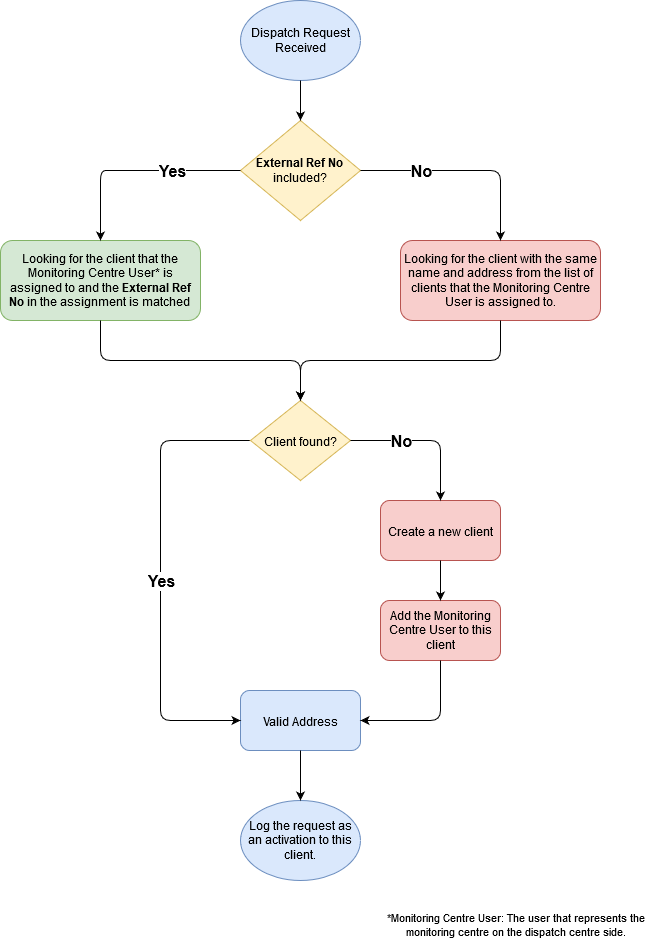
Once the dispatch centre's Patriot has received a dispatch request (from another copy of Patriot), Patriot will look for the client by the External ref No. If the External Ref No is not included in the request (i.e. this is an ad hoc dispatch request), Patriot will search client by name and address. The flowchart below is how Patriot find the correct client to log the dispatch request.

The dispatch request received by the dispatch centre contains the address of the client, Patriot will use this information to update existing client, in both case and address validation is performed (please refer to the flowchart above).
Address validation will involve checking the fields of the address from the dispatch request which are stored as records in patriot (i.e. city, state, country, and in some cases postcode) and ensuring they all exist in the dispatch database, where one or more fields don't exist the validation will fail.
By default, Patriot will add any City, Postcode, State, Country values which do not exist. To switch this behaviour off, set System Menu Item -> System Settings -> System Wide Settings -> Response Settings -> Dispatch Settings -> External Dispatch Address Verification to manual mode. Automatic mode is the default setting.
On "Manual" mode, the operator is required to verify the address on the form which pops up when the activation created by the dispatch request is opened (see image below). Fields with no existing record must be verified (for example, misspelled fields will need verifying and fixing). If the validated address is different from the client address, the client address is updated and a system address change signal will be logged.
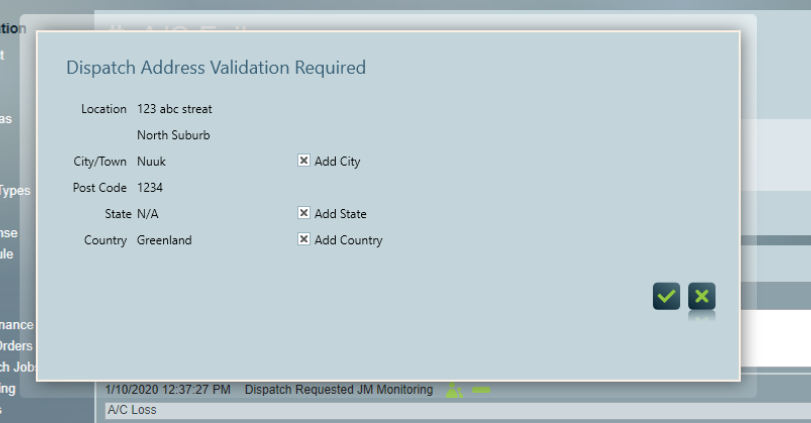
Note: If the operator can't verify the address, by clicking the "cancel" button, Patriot will notify the monitoring centre the dispatch request has been rejected.
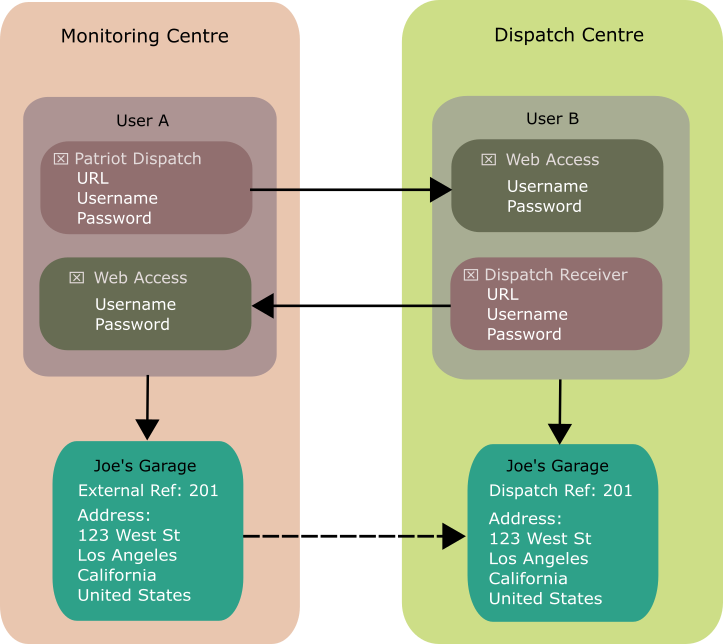
The following is an example of how to configure Patriot Dispatch so that the Monitoring Centre can send dispatch requests to the Dispatch Centre via Patriot:
Create a user to represent the Dispatch Centre on the Monitoring Centre side.
Under Remote Access Tab of this user, enable "Patriot Dispatch". This allows the user to send dispatch requests to another copy of Patriot.
Select a Dispatch Event Template.
On the Monitoring Centre side, the operator selects from event types configured in this template when they send the dispatch.
Event descriptions from the Monitoring Centre will be sent with the Dispatch Request, so the Dispatch Event Template can be very general -- you can start by creating just one event type, e.g. "Dispatch Request".
On the Dispatch Centre side, an event template containing the same event types should be assigned to any accounts that will receive dispatch requests. Each action plan used for the event types in this template must be set with a priority greater than 0, and also configured with option Generate New Alarm With All Priority Events enabled.
Enter the Dispatch Centre's Patriot server's URL. Make sure to include the correct API Port number in the URL.
Enter the User Name and Password of the user that represents the Monitoring Centre in the Dispatch Centre side. (More on this later.)
Still on the Remote Access Tab, enable "Allow Web Access", and enter a User Name and Password. These credentials will allow the Dispatch Centre to communicate back to the Monitoring Centre.
Create a user to represent the Monitoring Centre on the Dispatch Centre side.
Under Remote Access Tab of this user, enable "Dispatch Request Receiver", this means this user is used to receive dispatch request from another copy of Patriot.
Select a Default Dispatch Client, this client is used when Patriot can't find the client the dispatch request sent.
Enter the Monitoring Centre's Patriot server's URL.
Enter the User Name and Password of the user that represents the Dispatch Centre on the Monitoring Centre side, which has been set up at step 6.
Still in Remote Access Tab, enable "Allow Web Access", and enter the User Name and Password. This User Name and Password is used in step 5.
Assume the client exists in the database of both Monitoring Centre and Dispatch Centre, now assign user "Monitoring Centre" to the client on Dispatch Centre side and do the same with user "Dispatch Centre" on the Monitoring Centre side.
The last step: when assigning "Monitoring Centre" on the Dispatch Centre side, make sure to enter the client External Ref No of the same client on the Monitoring centre side into the Dispatch Ref textbox under the "Client Details" heading when viewing the "Monitoring Centre" user under the Users tab of the client.
This is required to match up the client between the two databases when the dispatch is not an ad hoc request (Ad hoc request will search client by name and address).
Inbound authentication is handled by the API (using the same authentication system as ICA). Outbound communication is sent through the Dispatch Task.
You will need to create a Patriot Dispatch(233) task on both Monitoring Centre side and Dispatch Centre side. The task on the Monitoring Centre side is required to send out the initial dispatch request.
Patriot allows for the setup of client ID ranges as per monitoring centre. A user that set up as the Monitoring Centre User will have Client ID Ranges tab enable. When creating a new client from a dispatch request, a client ID will be fetched from those ranges. Failure to fetch a free client ID will result in the dispatch request failing.
On the Monitoring Side, when an activation is created, same as dispatch via
other methods, click the ![]() icon of the
user "Dispatch Centre" and select "Patriot Dispatch" from the drop-down list.
icon of the
user "Dispatch Centre" and select "Patriot Dispatch" from the drop-down list.
When sending a Patriot Dispatch, the operator can select an event type which the Dispatch Centre will receive. Note: make sure the event type's action plan has a priority level higher than 0 and Generate new Alarm event for all priority events enabled, otherwise the dispatch request will not trigger an activation on the Dispatch Centre side.
On the Dispatch Centre side, a new activation with the event type selected by the operator from the Monitoring Centre side is created. Depending on response plans, Patriot may auto-dispatch patrol users, or the operator on the Dispatch Centre side can manually dispatch patrol users.
When the dispatch operator first opens the activation, this automatically accepts the Dispatch Request, sending a status update back to the Monitoring Center. Failure to Accept the request within the Ack Wait Time (set in the Patriot Dispatch Task) will result in the request timing out, and will inform the Monitoring Operator.
Dispatch Request Activations will include a Dispatch Request button, on the Activation Form, which gives access to additional dispatch request details, and also allows for giving feedback to the Monitoring Center.
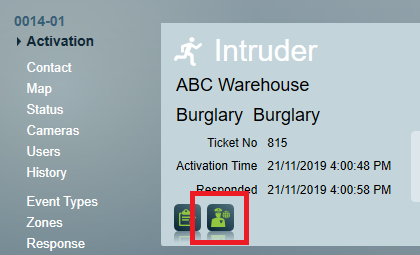
From the Dispatch Request screen, the Monitoring Station can then either cancel or complete an active Dispatch Request:
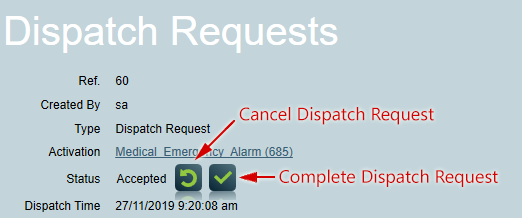
Alternatively, an ad hoc dispatch can be sent by tick the "Ad Hoc Address" checkbox. This would allow the operator to manually enter the client detail on the dispatch request.
In the dispatch centre, when an ad hoc request is received, Patriot will search client by the name and address the operator entered instead of using External Ref No.
If, after requesting a dispatch, the Monitoring Station wishes to stand down the request, they can do so by clicking the ![]() button.
button.
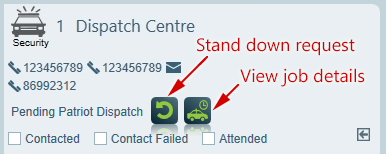
If the request has not yet been accepted at the Dispatch Centre, the request will be cancelled. If the request has already been accepted, it will notify the assigned operator at the Dispatch Centre.
Operators can also send dispatch requests when a situation requires it (eg through a phone call requesting dispatch).
This is available on the Activations window (Monitoring -> Current Activations) and clicking on the ![]() button
.
button
.
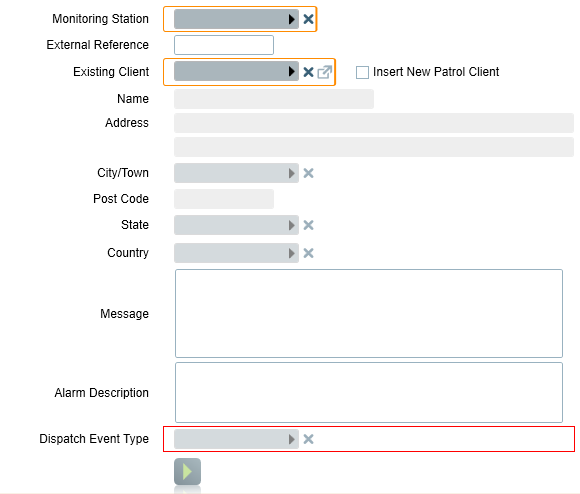
The Manual Dispatch form can auto-fill client details if an external reference of the dispatch user and the monitoring station, matches an existing client. If there are multiple matching clients, the first client will be used to auto-fill the form and the rest of the list can be viewed by opening the client selector. When the operator selects an existing client, the form will also be auto-filled. Note that selecting a monitoring station is filtered to users who have Patriot Dispatch Receiver type enabled. The event types configured on the client will be used as the event types available for selection on the form.
The operator also has an option of creating a new client instead of using an existing client when sending a dispatch request. Selecting a monitoring station user is required because the default event template configured will be used, as the event types available for selection on the form.