The Microsoft Report Builder 2.0 must be installed in order to edit the report files.
Note: Do not install version 3.0 of this program as it is incompatible with Patriot.
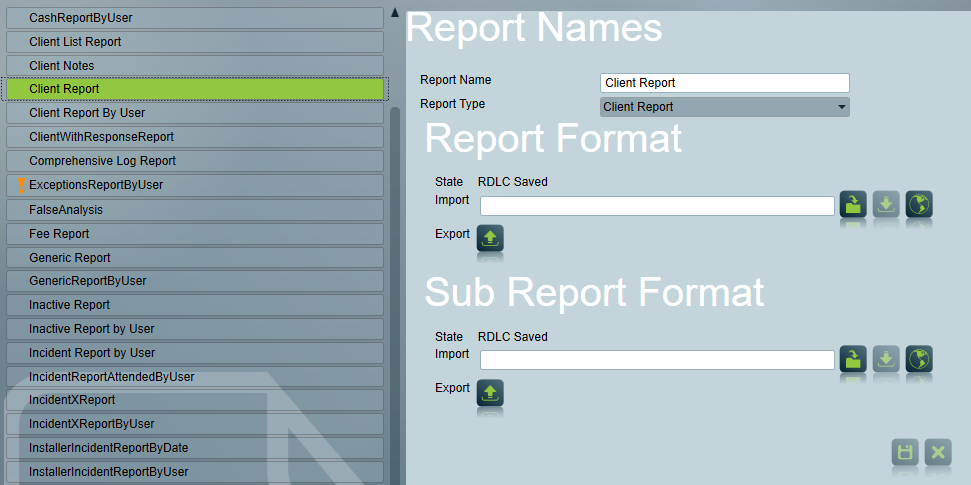
Reports should be created by modifying the existing standard report provided by Patriot. To export the report from Patriot, open the Reports->Settings->Report Names screen. Select the report that you want to export. If you want to make sure that you have the latest report file, click on the web download button and it will be downloaded from the Patriot webserver for you. Next, select the Export button, and an RDLC file will be saved.
Note: It is also possible to use the web download button to return the report to the standard layout if required. This will overwrite the existing RDLC file including customisation, so please ensure you have a backup of any customised files before doing this.
Run Microsoft Report Builder 2.0. Open the .RDLC file exported above. You will need to change the file filter to 'All Files' to see the .RDLC file, as by default it only shows .RDL files. You may get warnings about selecting a Report Server. You can safely ignore these, as Patriot will configure these settings when the report is run. Simply cancel the Report Server warning and continue editing.
Once the report has been opened in Report Builder, you will see a graphical editor that allows you to redesign the report as needed. For example, you can add extra text boxes, change fonts, add sections, and remove unneeded information. The report data itself is provided in a list along the left side of the screen. Extra fields can be dragged from this section onto the report to be included. The full features of the Report Builder are outside the scope of this document. More information can be found on the Microsoft website and around the web.

Images can be added to the report file by selecting Insert -> Image. For standard fixed images (e.g. Monitoring Station logo), select the image source as Embedded, and browse to the required file. The image will then be copied inside the .RDLC file itself, and the original is no longer required.
It is also possible to define a per-user image (e.g. for Dealer Branding, or Installer Logos). See Dealer Branding for information on how to save the images and enable branding.
Once this is configured, change the image settings in the RDLC file to match the following:
Image source : Database.
Use This Field:
Use This MIME Type:
On the Visibility tab, select Show Or Hide Based On An Expression and set the expression to:
This will display the dealer image as required, and hide the image area if the user has no image or if the report is being run for a single client grouping. Images will not be included if Dealer Branding is disabled.
Note: Patriot enforces a maximum file size for RDLC files when importing. Because standard images are stored inside the .RDLC file, embedding a lot of images could cause the maximum file size to be reached. If this happens, use smaller images or remove unnecessary items to reduce the file size.
Once the file is modified to suit, you can import it back into Patriot to test. Simply return to the Reports -> Settings -> Report Names screen in Patriot. If you wish to replace the existing report, you can select this report, browse to your new file, and import it.
It is also possible to create a new report so that multiple layouts for the same report can be used (e.g. for different customers). To do this, click on the + button, and enter the details. Select the same Report Type from the selection menu to make sure that the correct data is loaded for the report. Then, import your layout file as before.
You may need to log out and back in on the Patriot client before the new report appears in the menu.
There are some examples of existing custom reports available from the following page:
Downloadable Custom Report Layouts
The Incident Report contains some information which is pre-processed by Patriot before being displayed in the RDLC, such as activation creation time, operator actions, and provided notes. Due to this information being processed before the RDLC layout, it is not possible to edit the information in the standard way. The phrases used can be edited through the translation options. See the translation documentation for a general overview of translating segments of Patriot. Once translation is set up, change the required phrases in the IncidentReportRes file. If a certain piece of information is not required in the report, leave the translated phrase blank. This will remove the phrase and the associated information. Ensure that the 'Translated' check-box is enabled to include the blank phrase. By default, a blank phrase indicates to use the original English phrase instead of translating.
| Phrase Name | Default Value | Blank Value Effect... |
|---|---|---|
| PickupOperator | "Operator" | Operator ID does not appear on report. |
| PickedUpActivation | "Picked Up Activation" | Activation ID number does not appear on report. |
| OperatorResponseTime | "Response Time" | Operator response time does not appear on report. |
| OperatorNameSeparator | ": " | Operator name does not appear on report. |
The Incident report can also be customised to include or exclude certain operator actions displayed in the report. See the Include Note Type On Reports section in the System Settings documentation for an overview of the operator actions. These settings allow the option to display which actions are relevant to the report and omit the actions which aren't relevant to the report.
In the Patriot Client the Client ID, Area, and Port ID of a Client is typically displayed with the Client ID and Port ID separated by a hyphen, with the Area included in brackets if it exists. For example:
0001-01 means Client 0001, Base area, port 01.
0022(4)-01 means Client 0022, Area 4, port 01.
In the Patriot database, these numbers are stored as a single string with no separator characters. For the above examples, these would be 0001BASE01 and 0022000401.
If you want your report to use the more readable format used in the Patriot client, you will need to insert some code into the report to format the database string to a new field, then use the code as part of an an expression wherever the Client_No field is used in the report.
Right click in empty space around the report, then click Report Properties, then switch to the Code tab.
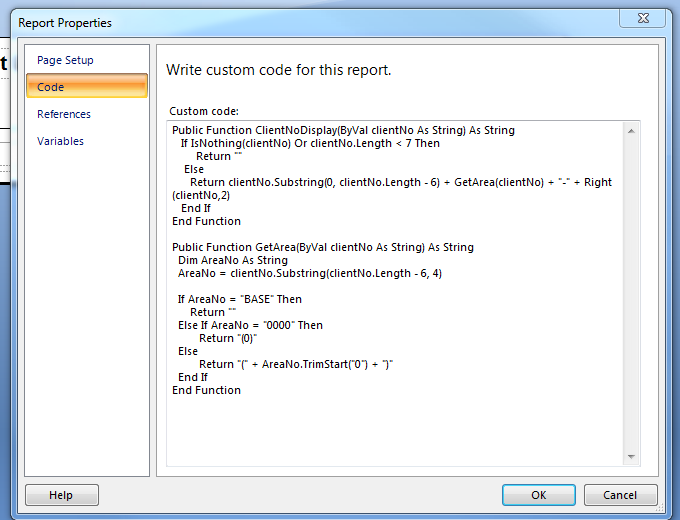
Copy and paste the code from the box below into the Code tab:
Public Function ClientNoDisplay(ByVal clientNo As String) As String
  If IsNothing(clientNo) Or clientNo.Length < 7 Then
    Return ""
  Else
    Return clientNo.Substring(0, clientNo.Length - 6) + GetArea(clientNo) + "-" + Right(clientNo,2)
  End If
End Function

Public Function GetArea(ByVal clientNo As String) As String
  Dim AreaNo As String
  AreaNo = clientNo.Substring(clientNo.Length - 6, 4)

  If AreaNo = "BASE" Then
    Return ""
  Else If AreaNo = "0000" Then
    Return "(0)"
  Else
    Return "(" + AreaNo.TrimStart("0") + ")"
  End If
End Function
|
Save your report. Now you can use the code as part of an expression. Right click on a textbox that will contain the client number, and click on Expression to bring up the expression editor window.
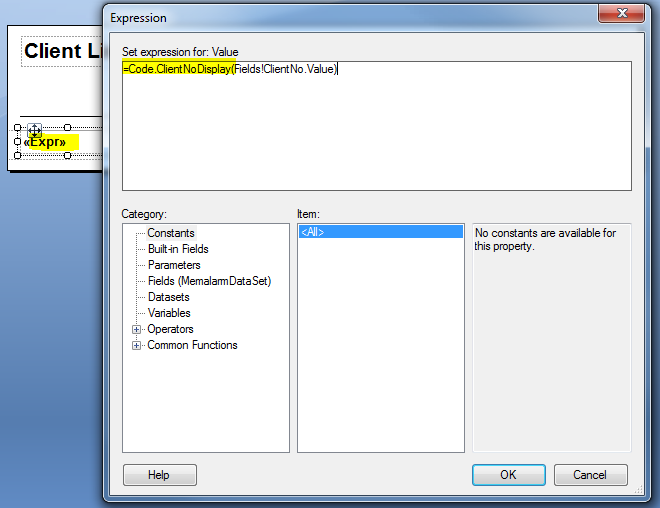
To use the custom code to format the client number, enter the following expression:
=Code.ClientNoDisplay(Fields!ClientNo.Value)
Patriot Action Plans are identifiable by their configured colours. It is possible to format a report using the colour information and make it easier to read and identify. If you want your report to use Action Plan colours used in the Patriot client, you will need to insert some code into the report to format stored colour value, then use the code as part of an an expression when defining the colour of a report object.
In a Report's Properties (Right click in empty space around report, then click Report Properties, then switch to Code tab) input the following code:
Public Function ColorRGB(ByVal Value As String) As String

       Dim ColourInt as Integer
       Dim RHex as String
       Dim GHex as String
       Dim BHex as String
       ColourInt = CInt(Value)

       RHex =  Hex(ColourInt And 255)
       GHex = Hex((ColourInt >> 8) And 255)
       BHex = Hex((ColourInt >> 16) And 255)

       Return "#" + RHex.PadLeft(2,"0") + GHex.PadLeft(2,"0") + BHex.PadLeft(2,"0")
End Function
|
Now you can reference the code in the document. When selecting the colour for any Text, Line, or Fill instead click the Expression button next to it and input the following Expression:
=Code.ColorRGB(Fields!RowColour.Value)
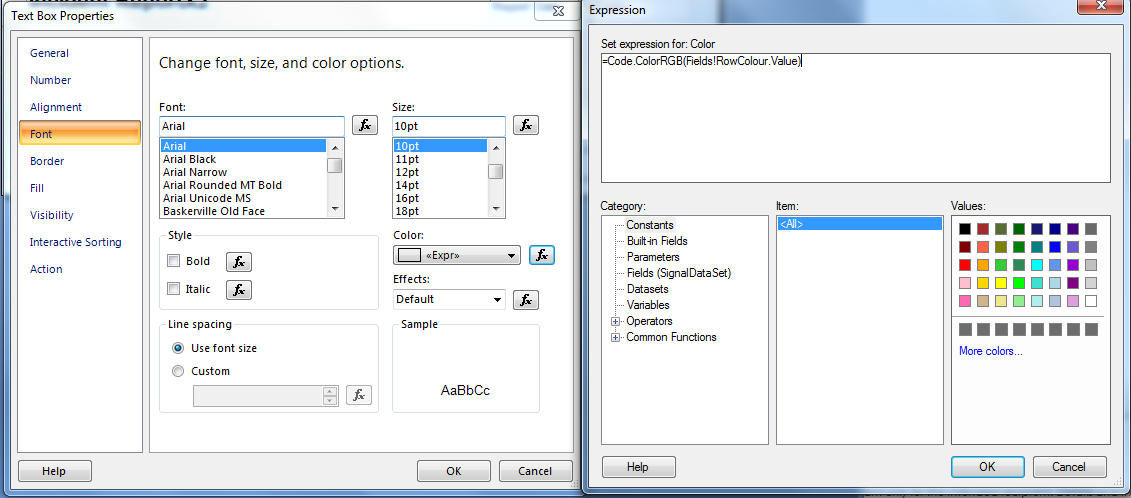
Setting the colour of text using the Action Plan Expression