Patriot has several tasks that can be triggered when a signal is logged. These tasks can perform a variety of actions, but are all assigned in the same way. A consistent approach has been used in the design of Patriot software so that if you understand how to page a message out to a message pager on receipt of a certain signal, you should also be able to send a message to an email address, a voice telephone or GSM mobile phone. All tasks are assigned in a similar way. If you understand the principle you will be able to apply it to your specific messaging requirements.
This document will cover:
Patriot Task Hierarchy
Assigning a Messaging Task
Common Task Setups
Most alarm signals in the security industry can be divided into three main components; a site or client account number (e.g. 1000 area 01); an event type (e.g. 130 meaning burglary or 401meaning opening); a zone or user (e.g. zone 01 or User 02). Patriot also employ's an additional field to identify the signal and isolate the client as belonging to a certain subset. As patriot does not log reciever or line card Id's in the signal this is most often used to group the signals by reciever recieved on.
In a signal there is an inherent hierarchy of zone or user at the top, down to event type, down to client number, and finally global level. Patriot takes advantage of this hierarchy to decide what action plan to use with each signal logged. See Action plans for more information on this process. Once an action plan has been found, a Response plan is generated which has been assigned, for this client, to this action plan. Each user in this response plan can have none, one, or many tasks assigned to them. If a task has been assigned to a user in the response plan, the task will fire.
The hierarchy, along with the fact that tasks are assigned to users gives a huge amount of flexibility and also makes settings up new tasks very fast and efficiently.
For the purposes of this chapter we are assigning the email task but this would equally apply if you had set-up Paging Pacnet, Pet Protocol, telephony or GSM Messaging, or any other assignable task. As already stated all these tasks essentially work the same way.
There are many different scenarios for assigning tasks. Firstly we will cover assigning a task to an action plan on a client. We will then cover a few of the common ways of setting up assignable tasks.
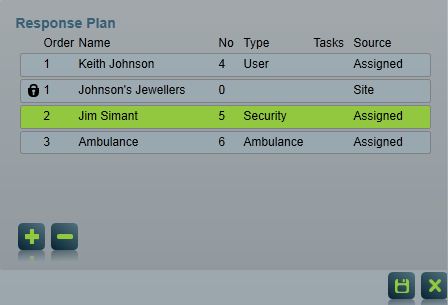
Tasks are assigned to Users in the Response Plan area of the Response Tab of a client
Response Plan
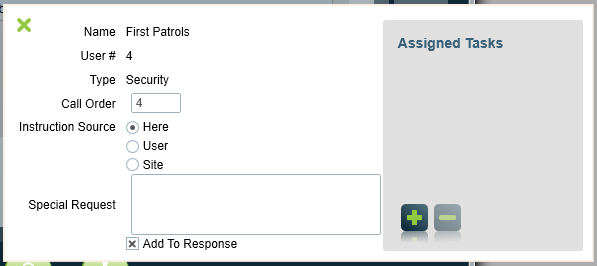
Double click the required user in the Assigned Users list. A pop up will appear containing information about the User and a grey Assigned Tasks area. If no users have been assigned, assign a user. See USERSTAB for how to do this.
Any tasks listed in the assigned tasks list, have been assigned and will fire when this action plan is logged.
User Information popup
 Click the Add
button within the Assigned Tasks area to show available tasks for this user.
Double click a Task in the list to assign a task.
Click the Add
button within the Assigned Tasks area to show available tasks for this user.
Double click a Task in the list to assign a task.
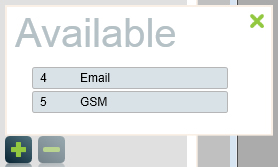
Availalble Tasks popup
A system icon will appear on the list item of the User if they have a Task assigned to them
![]()
System Icon
Some tasks have additional settings. Double click on the assigned task to display these.

Additional Settings
If supported (requires Advanced Messaging Module and GSM, SMS Gateway, or Email Task) the message can be set to Acknowledge Required. The Escalation Level can also be set, so the message is delayed until the previous person fails to acknowledge.
If supported (requires the Advanced Messaging Module) the message can be set to Manual mode. This will delay the sending of the message until the operator manually sends it from the activation window.
If supported (requires the Advanced Messaging Module and GSM, SMS Gateway, or Email Task) the Message Format can be selected from any that have been configured in the task settings. Setting up additional message formats can be useful so the message makes sense in particular situations. You can also include instructions in the message header and footer.
Using the Global Response Plan
If there is a User who always wants to be sent a text message (or any other task output) every time a particular action plan is used (for all clients), for example high priority alarms, assign that user to the global response plan of this action plan. Then that user will always be included in the response plans of that action plan. Using this technique is a very fast way setting up any of the paging tasks. A good example of this setup would be a GSM monitored operation where one guard is sent a txt message for every event that occurs regardless of the client.
Go to Maintenance -> General -> Action Plans. Edit the desired Action plan. Under Global Response Plan, choose a client that the User has been assigned to. Then click on the Assign Response Plan button and the User should appear in the list of available users. Assign the User to the response plan, and assign the task to the User.
If you don't want this User to appear on Activation Response Plans for this Action plan, double click on the User, under Assigned Users. This should open up the Edit Special Dispatch Instructions window. Uncheck Add to Call List.
Save of changes. Then make sure the User has the correct Pager No, phone number, fax number, email address that is required.
Using Client Response Plan
To make setting up response plans quicker, it is possible to use the response plan assigned to the client level Action plan, but from Action Plans which have been assigned to event type, zone, or User level. This gives you flexibility in changing the priority, colour, etc of Alarms by using different Action Plans at event type, zone or user levels, but having many different Action Plans all use the one response plan.
Make sure there is no response plan assigned to the desired Action Plans at event type, zone or user levels (this includes Global Response Plans). Go to Maintenance -> general -> Action Plans. Edit the Action Plan (that is assigned to event type, zone or user level). Check on Use Site as Default Response. Save the Action Plan. Warning: ticking this on will effect all clients using this Action Plan. Now go back into the client involved, and assign a response plan to the Action Plan which has been assigned at client level.