User Access
The Patrol Response module adds additional features to the Plink smart phone application, including Patrol Response, Guard Tours, and Welfare Checks.
Within Patriot, ensure the Patrol user is configured as a dispatchable Patrol, as covered in the Patrol Dispatch documentation.
Ensure that 'Patrol Dispatching' is enabled for the patrol user, on the Dispatch tab.
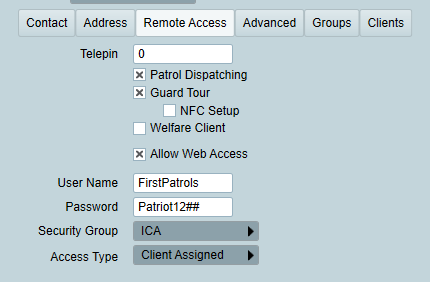
The Patrol user must also have ICA access configured from the Remote Access tab of the user, with a suitable username/password. The user only needs to be assigned read only level of access to ICA.
Options for Patrol Dispatching, Guard Tour, and Welfare Client access are also available. Each user can be given access by enabling these options as required.
Within the app, the Patrol user can now follow the standard registration process for Plink, using the monitoring station code and their ICA username/password, as described in the Plink documentation. Once the Patrol has logged in, they will have additional options available along the bottom of the app
Operators will now have the ability to dispatch activations to the patrol user for patrol response.
When assigning a dispatch user, a new 'Dispatch To Patrol' option will be available. When this is selected, a notification will be sent to the patrol, who can either accept or release the activation.
When selecting a pending patrol response job, the Patrol will see details of the job, such as alarm details, site details, and instructions.
The patrol then has several options available during the response:
Accept: The patrol accepts the job, and will travel to site to respond to the alarm.
Release: The patrol is unable to respond to the alarm. This will notify the operator to re-assign the job to another patrol.
On Site: The patrol has arrived on site.
Left Site: The patrol has completed their response and has left the site.
Add Note: Allows the patrol to enter additional response notes and observations.
All actions are transmitted back to the operator and recorded in the alarm response.
Patriot zones can be configured with scan codes, which can be scanned by a patrol during a guard tour.
Scan codes can be entered on a zone record, along with a desired scan frequency.
A Scan Code Exceptions Report is available to report on zones which have not been scanned at the correct frequency.
The following signal types need to be added to the relevant templates:
65550: Patrol Guard Tour Scan
65551: Patrol Guard Tour Note
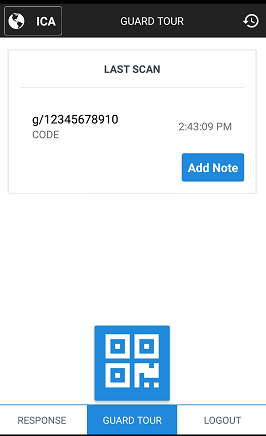
During the guard tour, the Patrol will be able to scan the preconfigured codes to indicate that they have checked the surrounding area.
Notes can also be added after the scan process, to report additional observations.
All actions taken are logged against the client associated with the scanned zone. Unknown/invalid scan codes will be reported to SYST(1)-01.
The app supports the scanning of NFC tags and Data Matrix codes.
NFC tags will be read whenever the phone is places within a short distance of the tag. When a tag is read, the app will be automatically opened (if not already), and the new tag read will be displayed on the Guard Tour page within the app. To read an NFC tag, the phone must have support for NFC.
New NFC tags can also be written using the app. The User logged into the app must have NFC Setup access, as specified from the Remote Access tab of the user. From the Guard Tours page, select the NFC Setup button,

NFC Setup Button
This will open the NFC Setup page. Enter the unique NFC Code into the Scan Code field.
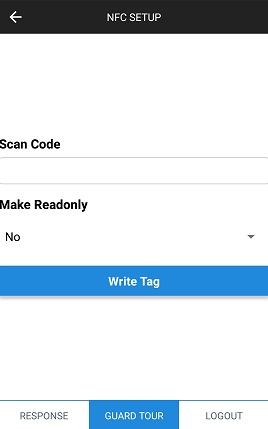
NFC Setup
To read a Data Matrix Code, from the app select Guard Tour, then click the Data Matrix Scan button,

This will open the camera to allow for the scan of the code. Place the code within the guide box on the screen. The torch can also be turned on using the torch button. Once turned on, it will default on the next time a scan is made.
New Data Matrix stickers can be generated using this webpage within the Patriot support portal, Data Matrix Code Generator
Create a new action plan, called 'Welfare Check overdue'. This should be a priority event. Use Action Plan Scheduled Actions to redirect to a non-priority event while the site is closed.
Import the Welfare Checks template from the Patriot Templates Library, and ensure that the Welfare Check Overdue event (type 65002) is using the new Action Plan.
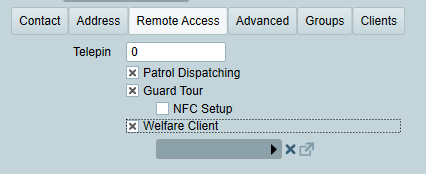
Set up a new client for each Patrol/User who requires welfare checks. Assign the designated client to the user from User Maintenance, Remote Access tab of the User. With Welfare Client enabled, a client selector will display allowing selection of the client.
This welfare client needs to have the following settings:
Type template: Needs to be set to the Welfare Checks template imported above.
No Signals Monitoring: Needs to be set to the welfare check frequency (e.g. 30 minutes). If required, alter the reset time to avoid extra events outside of the patrols active hours.
Schedules: An opening event is sent when the patrol enables welfare checks, and a close event when they disable welfare checks. Patrol hours and late to open/late to close can be set up if required.
Mapping: If the mapping module is enabled, set 'Mobile Client' active on the client, so that location events will be displayed.
Once configured, the Patrol has the following options available:
Enable/Disable Welfare Mode: Begins/ends a patrol shift, and starts/stops welfare check monitoring.
Send Welfare Check: Sends a welfare check to the monitoring station, resetting the welfare check timeout.
Send Duress Alarm: Sends a duress/panic alarm to the monitoring station, requesting immediate assistance.
All actions taken are logged against the configured patrol account.
Welfare check and duress events will include the patrols location, which operators can view from the Mapping tab, if the mapping module is registered.