Note that there are no separate ICA updates, the ICA components are packaged into the main Patriot updater.
Run the Patriot client utilities program as an administrator.
This program can be found in the Patriot client install directory, typically C:\Program Files (x86)\Patriot Systems\Patriot Version 6 Client\UtilitiesProgram.exe
In the System Menu, select System Settings -> ICA Setup.
Note: If ICA Setup is unavailable, you will need to update your version of Patriot, or use ICA Manual Server Setup instead
The Patriot Data Service requires an HTTP binding to allow it to listen for incoming requests.
Ensure the Port Number matches the service API Port Number field, and that the user name matches the user which the data service is running under (typically NT AUTHORITY\SYSTEM).
The Patriot Data Service requires an SSL certificate to encrypt communication between the Data Service and the web server. This is a separate certificate than the one between the web server and the end-user customers.
Since this is only used internally between the Patriot server and web server, a self-signed certificate can normally be used. A trusted certificate from a 3rd party provider can be used instead, if required. If using an existing certificate, ensure it is installed into the local computer certificate store under the Personal\Certificates folder. Installing certificates into the current user store is not supported.
Ensure the Port Number matches the service API Port Number field, and then select an existing certificate or enter the details to generate a new self-signed certificate.
If generating a self-signed certificate, it must be exported, and installed into the trusted root section of the computer certificate store on the IIS Server.
From the System menu in the main Patriot client, select System Settings, then System Wide Settings.
On the General Client Settings tab, enter the Online Monitoring Feedback Email address. This email is used whenever a customer wants to request changes or send feedback from ICA.
On the Data Service Settings tab, check the Timezone Support option. ICA only supports Standard timezone mode, and timezones won't be displayed in ICA if Timezone support is set to Legacy or Disabled. See Timezones for more information.
Save the changes to the system settings.
At this point, the data service should have all configuration in place. The data service will now need to be restarted, in order to apply the new settings.
Once the service has restarted, check that you can access https://patriotserver:9005/ from the web server (replacing server name / port number to match configuration).
You should see a login page for ICA, and the certificate should show as valid.
Ensure that Microsoft Internet Information Services (IIS) is installed
Install the Application Request Routing and URL Rewrite modules for IIS.
Install an SSL Certificate and enable it. Follow the instructions from your SSL Certificate provider for this step.
If a self-signed certificate was used on the data service server, install the self-signed certificate as a trusted root certificate on the web server.
Run IIS Manager
Select the server, then select 'Application Request Routing Cache' in the Features View. Under Actions on the right, select 'Server Proxy Settings', then tick 'Enable Proxy' and save the proxy settings.
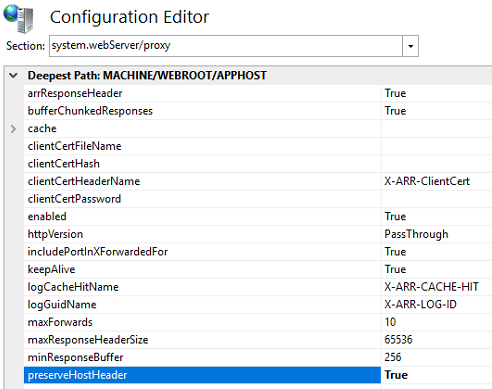
Return to the server Features View, then select Configuration Editor. Select the Webserver/proxy section. Find the key labed "preserveHostHeader" and set it to True.
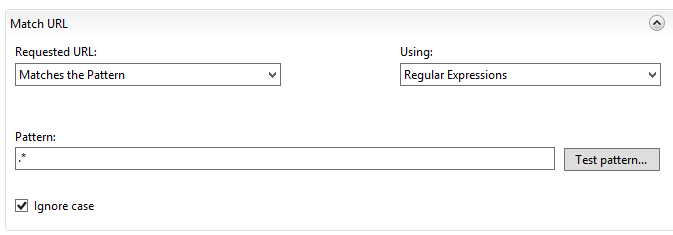
Return to the server Features View, then select URL Rewrite. From Actions, create a new blank rule.
Configure the rule as follows:
Add a new condition:
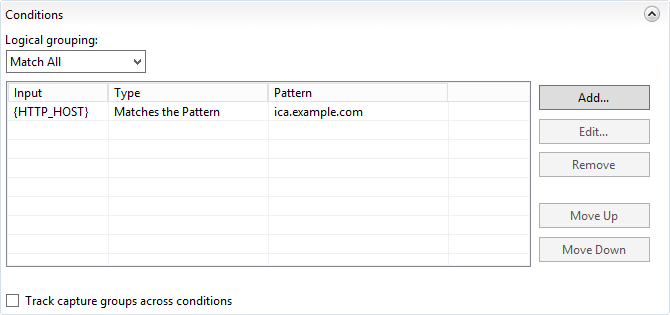
Update the pattern to match your ICA website address.
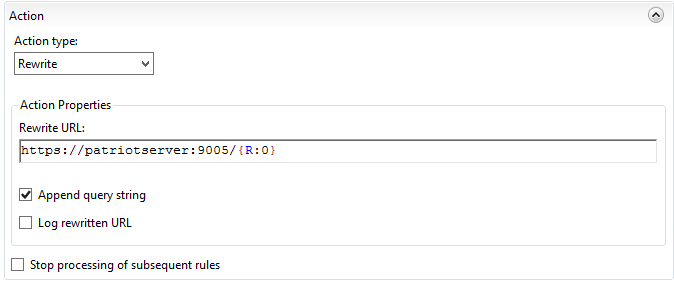
Update the URL to match your data service configuration. Ensure the /{R:0} segment is left on the end.
If you want visitors using HTTP to automatically redirect to HTTPS, which is strongly recommended, then add another rule as follows:
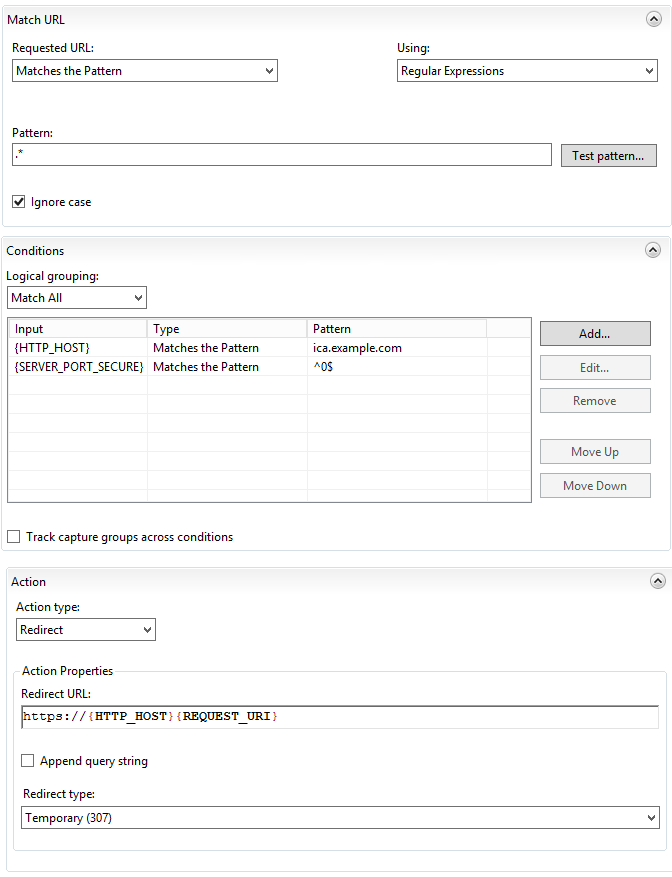
Again, update the URL in the condition to your ICA website address.
Note: You may need to register your new ICA website in your DNS records to be able to connect from external devices.
At this point, ICA should be fully configured.
Check that you can access ICA from external devices, and check that HTTP to HTTPS redirect is working, if you enabled it.
Accessing ICA from the internal network using the normal address will require NAT loopback support in your router, or other network configuration. Check with your IT provider to configure this as it is outside the scope of this document.
Please refer to ICA Customisation documentation.