Installing Microsoft SQL
Server
This chapter will guide you through
installing the required Microsoft SQL engine for Patriot 6 deployment. This
document covers all supported versions of SQL with sections to help the
non-automated full version installations. (when not using the provided SQL
express engine). If at any time you run into any unexpected problems
during any part of this installation guide, try the Patriot 6 installation
trouble shooting guide, or contact your software supplier. Alternatively you
can contact Patriot support directly at support@Patriotsystems.com
As an alternative, Patriot is allowed
to freely distribute SQL Express to anyone using Patriot. The express version
is purely a SQL database engine; it has some advanced functionality removed,
and has some size restrictions. But these should only affect users of Patriot
with a large client base. If you are trialing Patriot, SQL express will be more
than adequate. Comparisons of the different versions of SQL with respect to
Patriot are available on the Patriot website, hardware specification
page.Patriot 6 requires that either Microsoft SQL Server 2005/2008/2012
Database Engine, or Microsoft SQL 2005/2008/2012 Express Edition be installed
on the server machine. The full version of the Database Engine is recommended,
but requires separate licensing through Microsoft. For ease of use it strongly
recommended you use the patriot supplied installation package for express SQL
for easy configuration.
Depending on which version of SQL you
have opted to install. Follow the relevant sections that follow to confirm
installation and configure the version of SQL you are running. Once complete,
continue installation with the section entitled. Installing Patriot 6 on a
server. Previous
versions of SQL server such as SQL server 2000 or MSDE are no longer supported
in Patriot 6
For larger monitoring stations, read the SQL Server System Setup document for more
information on setting up an SQL server using recommended settings.
Installing SQL Server 2005
express
If you are using the supplied installation package or directed by patriot
support to download the distributed version of SQL from the website this is the
version you will be installing. The 2005 express edition has some features
removed, does not include the management studio and has an approximate database
limitation of 4Gb per database. Although this is usually more than enough for
new installations and well into the future for new monitoring operations where
years of data can be held.
- Make sure you are logged in as a user with administrative rights to this
computer.
- Check your computer specification and make sure that it is compatible
with SQL 2005.
- If you have downloaded Patriot from the website, run the file you
downloaded, this will extract the install files into a folder you select.
- From this install folder, run the file sqlexpressinstall.bat. This should
start the express installation program, which will guide you through the
installation process.
- When done, Restart your computer.
Installing SQL Server 2005
(full version)
- Check your computer specification and make sure that it is compatible
with SQL 2005
- Ensure you are logged in as a user with administrative rights to this
computer.
- Insert Disk 1
- Select Install Server components, tools, Books Online, and sample's
You must uncheck ‘Hide
advanced configuration options’ to get access to some required
settings.
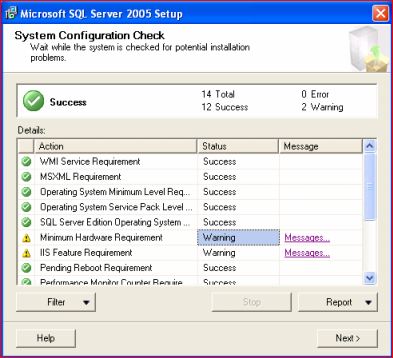
Setup will run a system configuration check, once
complete, check to see if any status warnings are reported. If so you may need
to check them with your system administrator or I.T department to discern if
these warrant concern. However, IIS is a possible exception as it is not
necessary and indeed recommended to be absent from your Patriot
server.
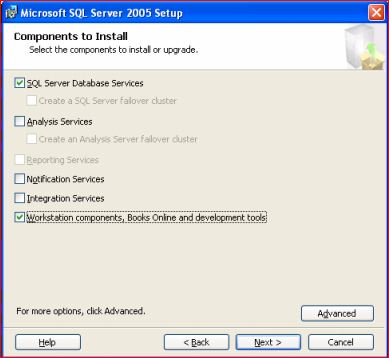
- Click Next and
on the following component screen ensure SQL server Database Service, and
Workstation components are selected .
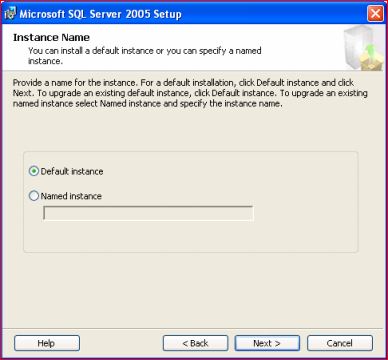
- Click Advanced
- Patriot must be installed in the Default instance of SQL. Select default
and press next.
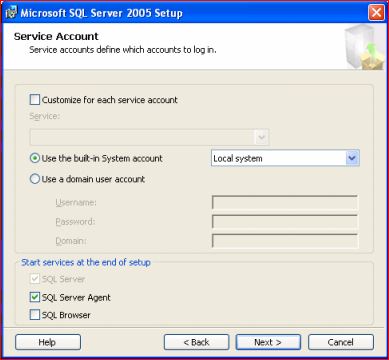
- On the service account window use the built-in system account and leave
it at local system. Check SQL server and SQL server agent. Check SQL
browser if you will be using remote workstation services; otherwise it is
not required, then click next
- Note: technically SQL agent is no longer required in version 6. So you
could opt not to install this component.
- Install SQL in mixed mode. Set the sa password to
‘Patriot12##'’, once Patriot is installed successfully, the sa
password can be changed if desired.
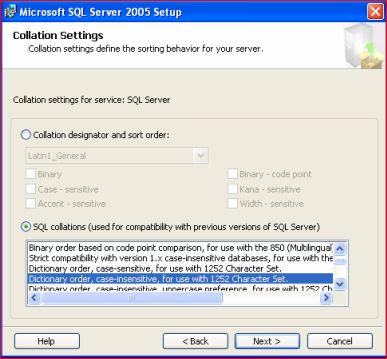
- SQL collation should be left as default
- Click next. Error and usage report setting window boxes should be left
unchecked. Now SQL 2005 is ready for installation.
- Insert Disk 2 when requested by the installation process, and click
OK.
- When complete, restart the computer.
- Follow with advanced configuration options in the following section.
(very important)
For problem free performance of your SQL database and Patriot software,
please ensure to complete the following sections after installation.
Configuring SQL 2005 for Workstation and Remote workstation
Connections.
- Click Start, point to Programs, point to Microsoft SQL Server 2005, point
to Configuration Tools, and then click SQL Server Surface Area
Configuration
- On the Surface Area Configuration for Services and Connections page,
expand Database Engine, click Remote Connections, click Local and remote
connections, click the appropriate protocol to enable for your environment,
and then click Apply.
- Note Click OK when you receive the following message:
- Changes to Connection Settings will not take effect until you restart the
Database Engine service.
- On the Surface Area Configuration for Services and Connections page,
expand Database Engine, click Service, click Stop, wait until the
MSSQLSERVER service stops, and then click Start to restart the MSSQLSERVER
service.
- Continue with Installing Patriot 6 on Server
Installing Microsoft SQL 2008 R2
- Ensure you have administrative rights to this computer
- Check your computer specification and make sure that it is compatible
with SQL 2008 R2.
- Insert SQL disk
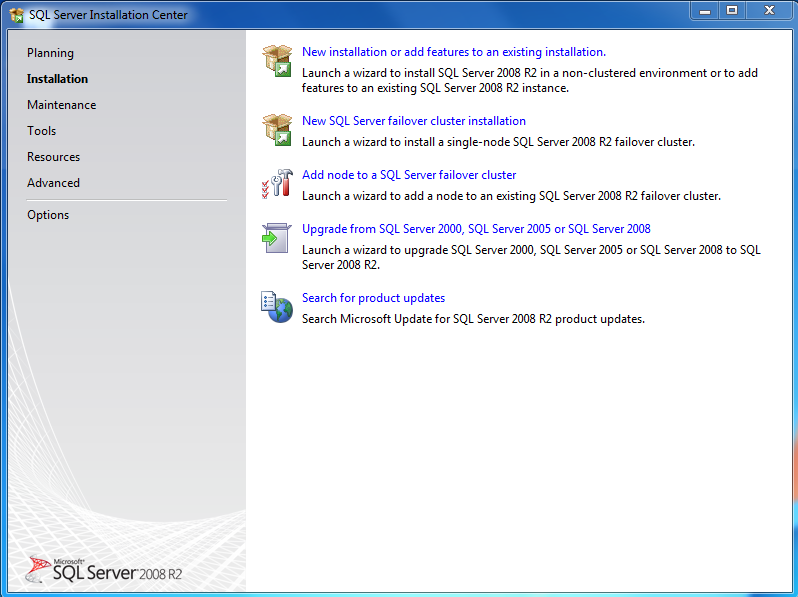
- When the screen below appears select 'New Installation or add features'
on the left hand pane.
- Select ok after the rule check runs and ensure there are no issues. Any
detected may need resolution before patriot will install correctly.
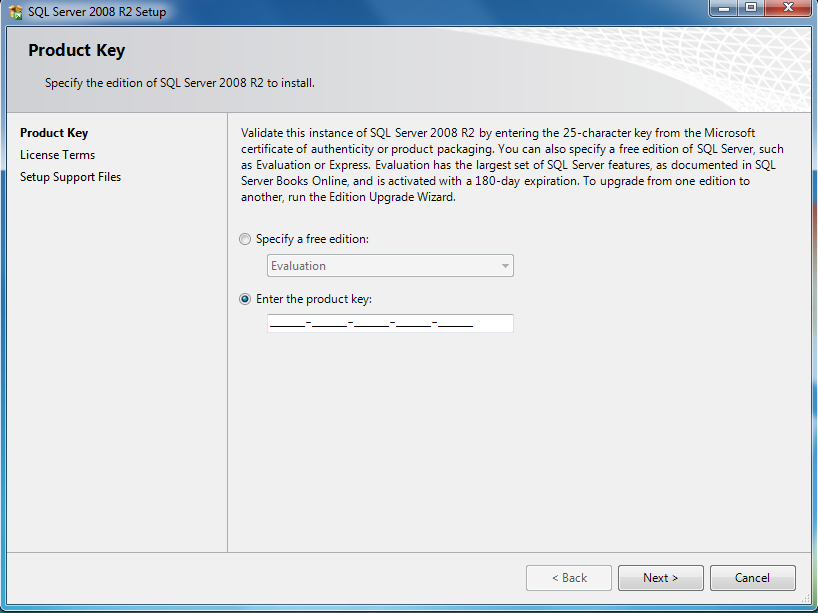
- Enter your supplied product key to register.
- Select the 'SQL Server Feature Installation'
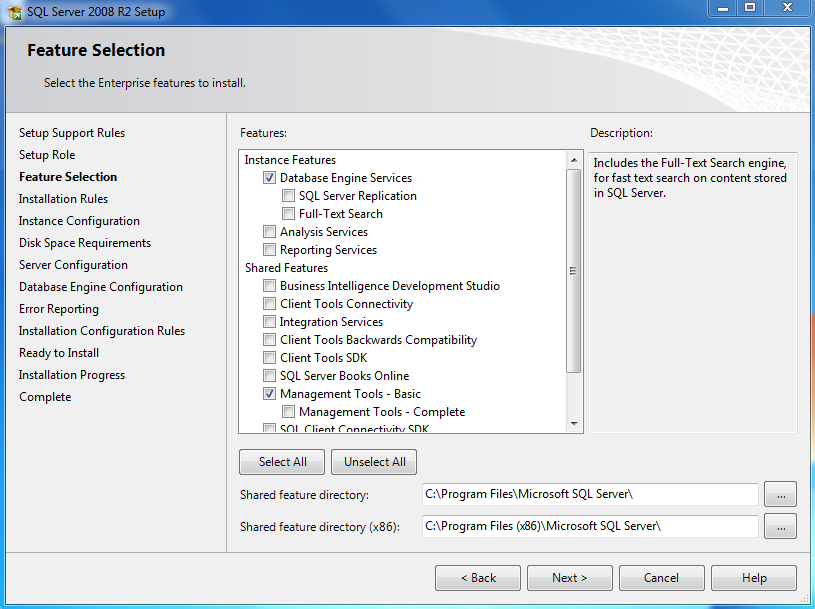
- Select the following required features;
Database Engine Services - SQL database
itself
Management Tools Basic - SQL Management
Studio
- Click next after rule check
- Select Default Instance/MSSQLSERVER
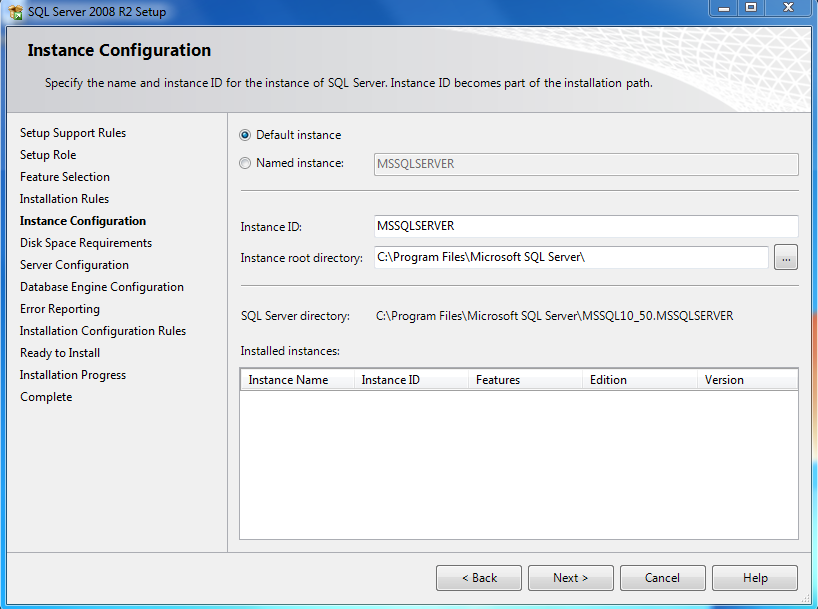
- Confirm space requirements are ok
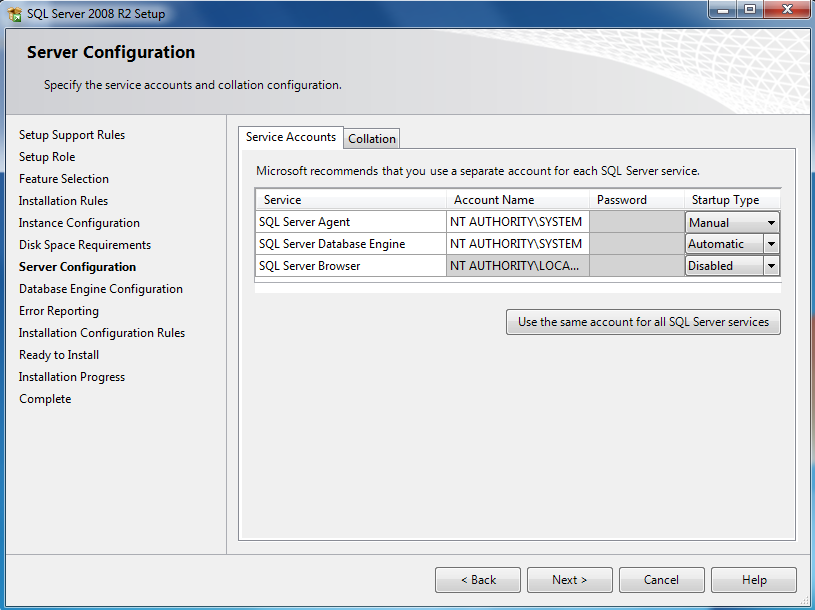
- Select 'use same account for all', choose NT Authority/System. Leave
collation as default
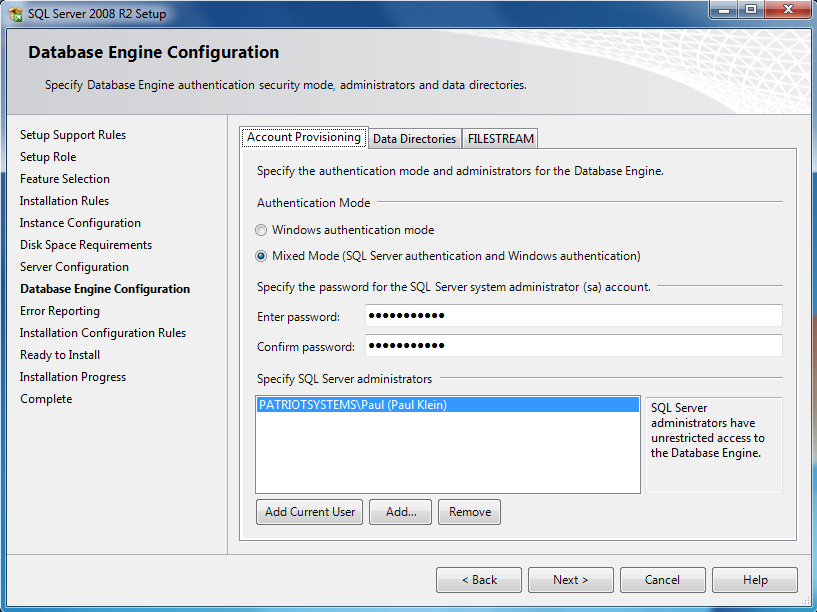
- Enable mixed mode authentication. Recommended to use a default password
of 'Patriot12##'. (for compatibility with Patriot instalaltion program).
Add current user as well. leave other tabs as default.
- Error reporting - Enable is you think you will need it, not nessesary but
maybe recommended
- Click ok after rule check
- Review settings - double check instance name is MSSQLSERVER. Also
Double-check Mixed mode enabled. Any issues encountered are likely to be in
regard to these two parameters.
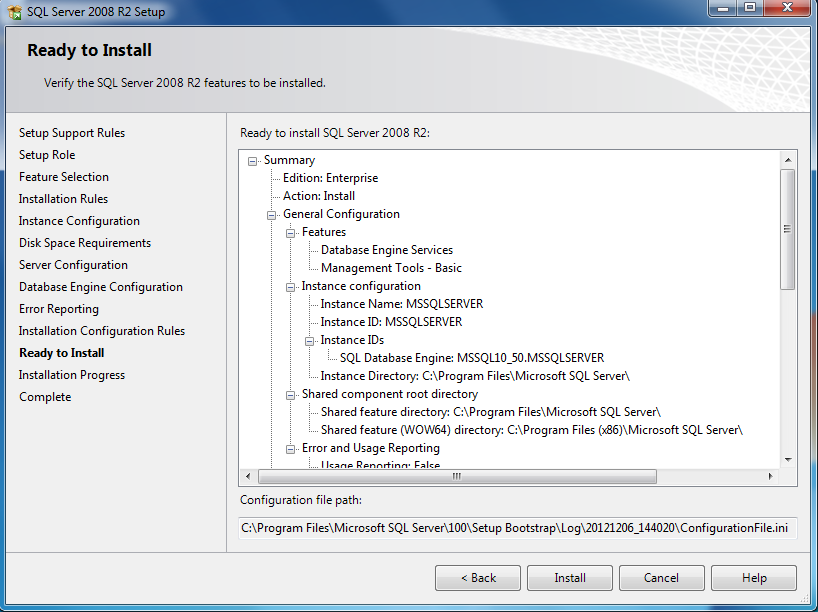
- Check final result's. If any major error's or failure is detected consult
your software distributor or support@patriotsystems.com
Installing Microsoft SQL 2012
Follow the steps below to install and configure SQL 2012
- Ensure you have administrative rights to the target
computer
- Check your computer specification and make sure that it
is compatible with SQL 2012.
- Insert the SQL Server DVD or start the downloaded SQL
2012 Setup Program
- Complete the planning phase of the SQL 2012 installation
process and move on to Installation
- Select the Installation type required. Usually this will
be the first option: New SQL Server stand alone installation Consult with
your network administrator if unsure which installation procedure to
follow.
- Ensure that all Operations of the Setup Support Rules
completed correctly. Any failures should be analysed and remedied before
continuing.
- Select the SQL Server Installation type or enter your
product key
- Install the Setup Support Files when prompted. View the
resultant Setup Support Rules report and remedy any errors reported.
- In the Feature Selection Window, the minimum, feature
set is;
•Database Engine Services
•Client tools Connectivity
•Management Tools - Basic
•Management Tools - Complete
- In the Instance configuration select Default
Instance
- In The Server Configuration window, select the Service
Accounts tab. For the SQL Server Agent and SQL Server Database Engine,
select the NT AUTHORITY\SYSTEM user from the drop down.
- In the collation tab, leave the values as default unless
specialised requirements exist. Click Next to continue.
- In the Database Engine Configuration, select the Account
Provisioning tab. Under Authentication Mode select:
- Mixed Mode (SQL Server Authentication and Windows
Authentication) Enter and confirm the SQL Administrator password. This must
be Patriot12## The Password is case sensitive.
- Add the Current User as an SQL Administrator
Account.
- Follow the on screen prompts to complete the
installation process.
When installing SQL 2012 on Windows 7 on a 64-bit PC you
may have to add system account NT AUTHORITY\SYSTEM as SQL sysadmin. After
installation of SQL 2012 is finished follow steps below: Please contact patriot
support if you are unsure how to do this.
- Open SQL Server Management Studio and run the following
query to check if account NT AUTHORITY\SYSTEM has system admin
permission
USE master
GO
SELECT p.name AS [loginname] ,
p.type ,
p.type_desc ,
p.is_disabled,
CONVERT(VARCHAR(10),p.create_date ,101) AS [created],
CONVERT(VARCHAR(10),p.modify_date , 101) AS [update],
s.sysadmin
FROM sys.server_principals p
JOIN sys.syslogins s ON p.sid = s.sid
WHERE p.type_desc IN ('SQL_LOGIN', 'WINDOWS_LOGIN',
'WINDOWS_GROUP')
-- Logins that are not process logins
AND p.name NOT LIKE '##%'
-- Logins that are sysadmins
-- AND s.sysadmin = 1
GO
- If value in column sysadmin for NT AUTHORITY\SYSTEM is
set to 0, you need to enable sysadmin for NT AUTHORITY\SYSTEM
- To change sysadmin permission for account NT
AUTHORITY\SYSTEM in SQL Management Studio go to Security > Logins. Right
click on NT AUTHORITY\SYSTEM > Properties > Server Roles and tick
checkbox for sysadmin. Click ok.
- Patriot 6 installation can proceed.