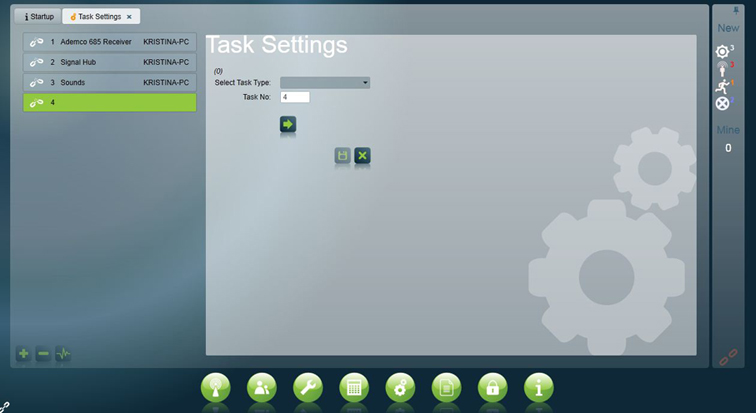
Tasks are set up from the available tasks listed in the Task Settings Window.
System Menu Item→Tasks → Task Settings
Adding a new Task from the Task Settings window.
The Tasks window displays a list of all the Tasks you have installed.
Many Tasks are freely available. Some Tasks require specific module registration. See the specific Task installation pages in this section for more details. If, you require a task which you are not registered for please email us at Sales@patriotsystems.com
 Click the Add
button at the bottom of the list to add a new Task. An empty list item will
appear in the list with an empty form to its right. Click the Select Task Type selector to show the Tasks dropdown
list.
Click the Add
button at the bottom of the list to add a new Task. An empty list item will
appear in the list with an empty form to its right. Click the Select Task Type selector to show the Tasks dropdown
list.
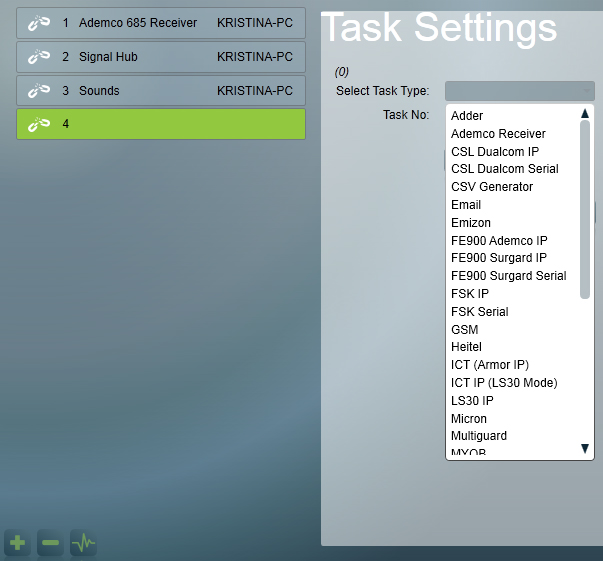
Selecting a Task Type.
 Select the Task
you require from the list and click Next. Continue to fill in the form fields
and click Save when finished.
Select the Task
you require from the list and click Next. Continue to fill in the form fields
and click Save when finished.
Note: Although not usually necessary, some tasks may require a restart of the client, data or task service to be fully enabled. In most cases this will be mentioned in the specific task setup documentation.
add legacy tasks note here.
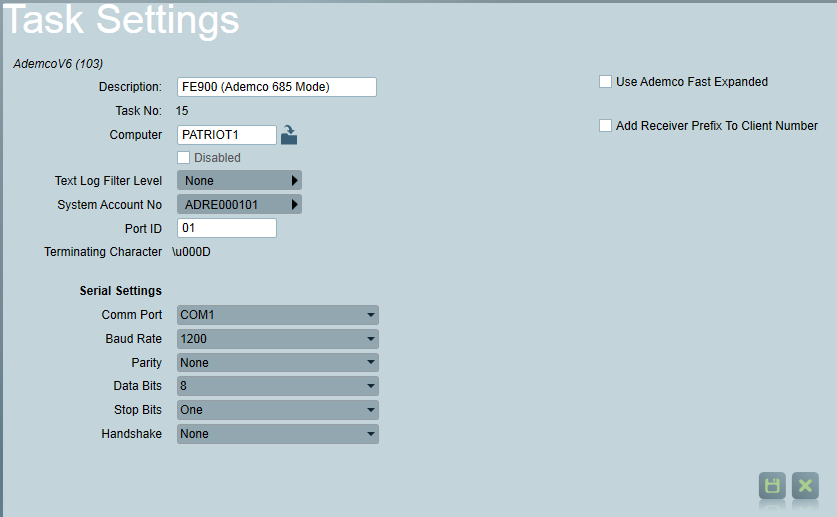
Task settings panel for the Ademco Receiver Task. Many settings are shared between Patriot's various receiver tasks.
Enter a Description of the task.
Select the Computer that this task is to be run on. It will be defaulted to the name of this computer.
Select the appropriate communications parameters: Port(Serial Comm Port), Baud Rate, Data Bits, Stop Bits, and Parity. These parameters must match the settings on the receiver so that information sent by the receiver can be interpreted correctly. These settings will normally default to match the default settings of your receiver. If you are having trouble getting any communication from your receiver, it is normally caused by having one of these set incorrectly. Most receiver these settings are configurable, so check your receiver to make sure these match exactly.
Enter a two digit Port ID. All client security systems that communicate with this receiver will have this Port ID appended to their client number. It will normally be entered as two digits, for example: "01". Leave this as the default of "01" unless you are monitoring duplicate account codes on different receivers, if so, change the port ID to a different value (say 02) to avoid any ambiguity.
Enter a System Account No. This is the account number which signals that apply directly to the receiver will be logged against (ie Low Battery, Line Card Failure). For the Ademco Receiver, use a System Account No of 9999000101.
Recording Raw Text. If you want to record raw text, enable the Log To Text File check box. This will cause raw text from the receiver to be written and stored in the text log. Normally this should be left off as it will slow the system down fractionally, but it is useful for trouble shooting purposes. Only one task at a time should have the Log To Text File check box enabled. Otherwise the text log will become mixed, making it difficult to determine which text log entries came from which task. Patriot 5 can use Text Logs to simulate your receiver, which is a very useful tool for investigating problems or new or unusual formats. Text Logs can be printed off and faxed to your distributor, but it is normally best to email the file, so the text log can be simulated for trouble shooting purposes. The Text Log can be found in the C:\Patriot5\Data folder on the Patriot server, and is called text_log.tps
Simulate Receiver Option. Normally the simulate receiver option must be off. It should never be activated in a live monitoring situation but it is useful for demonstration and trouble shooting purposes. To turn off the simulation the Activate check box must be unchecked. This option can be used to simulate a receiver by playing back a Text Log file. A valid Text_log.tps (previously recorded) file must reside in the Data folder if this option is activated. To turn on the simulation the Activate check box must be enabled. Once active, system performance can be dramatically improved by enabling the Load into memory check box. This instructs the system to load the first 100 text log entries into RAM, allowing for a much faster simulation. There are two options for a simulation. The first is a Fixed Interval so that a new signal will be created from the Text_log.tps file each time the specified fixed interval expires. The simulation will progressively work through the Text_log.tps file until it reaches the end then it will start back at the beginning of the file.The second option, File Date Time, enables a start date in the Text_log.tps file to be selected and the simulation will trigger a signal from the Text log file whenever the current clock time of the computer matches the time in the Text_log.tps file. This option is more like a live simulation. When the end of the file is reached the simulation will start back at the start date and current time.
Terminating String. The Terminating String for the Ademco Receiver should be set to <0D>. The Terminating String will normally default to the correct value. It is the hexadecimal ASCII value of the terminating character in a signal from the receiver. If necessary this can be changed to coincide with the attached receiver.
Strip Leading Characters. The Strip Leading Characters for the Ademco Receiver should be set to 0. This parameter can be used to remove unwanted leading characters from the raw data string produced by some receivers, such as a date and time string. Normally this parameter will be left as zero.
Disable Hardware Flow Control. The Disable Hardware Flow Control for the Ademco Receiver should be set to unchecked. This parameter allows RTS/CTS handshaking to be disabled, which may be required for some receivers or cabling configurations.
Use Ademco Fast Expanded Option. Generally this should be left unchecked. In some cases your software provider may ask you to change this when dealing with complex Ademco Fast clients.
 Save the
Task. Restart Patriot
Save the
Task. Restart Patriot
Testing communication. Go into the Task Manager Program, click on active tasks, you should see the Ademco Receiver displayed in the list. Highlight this task and click on the Raw Data button. This will display all raw data sent from the receiver and received by the task. In most cases you should at least see a poll from the receiver every 30 seconds, and also see any valid signals received by the receiver.
Each workstation on the network must have a unique computer name set up in its registry. The Computer functioning as the patriot server and running the Data service should be set with a static I.P address on the network.
Note: All network workstations running the Patriot 6 software must have their clocks synchronized within two minutes of each other, as the program uses these times to determine that background tasks are alive and functioning correctly.