Note: Also see High Availability Clustering, which offers a superior means of redundancy.
Patriot's database mirroring feature provides a very low latency 'warm' backup solution for businesses who demand the shortest possible monitoring down-time, and the most minimal signal loss in the rare event of a critical server fault. Database mirroring works by sending all transactions (received signals, activation status changes, client file updates, report settings, etc.) on the primary (principal) server in real-time - as they happen - to a preconfigured Patriot backup (mirror) server. This system keeps the two databases synchronised to within a fraction of a second, this is a marked reduction on Patriot's standard minimum automated backup time-delay of thirty seconds. With database mirroring enabled backup server testing is simplified; the server currently acting in the 'mirror' role can be promoted to the 'principle' in a matter of seconds (Note: actual down-time between primary and backup server monitoring will be longer and vary across systems as it is highly dependent on the alarm receiver/panel/camera hardware installed).
The full setup of Domain security and configuration is beyond the scope of this document and Patriot support. Additionally the setup or options may vary depending on the version of SQL or SSMS being used. In this section the general details and a basic setup of the SQL and Patriot components is covered and it the guide the domain user is given sysadmin rights. For a more manual setup domain users authenticating the connection require: Full access to the Patriot and PatriotArchive database, and Connect permission on the database mirroring endpoints. If you are concerned or do not have the knowledge to configure your domain, the non-domain setup can be used and is secure.
To authenticate mirroring over the network, a domain account needs to be
created. This should be a special account used only for the SQL service on both
servers and nothing else. Once created, you can assign the user account to SQL.
Open Services.msc from the start menu and find the SQL Server (MSSQLSERVER)
service. It will have a different name in brackets if you are not using the
default SQL instance name.
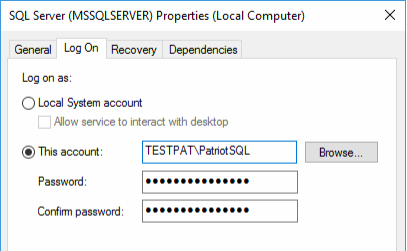
Right click the service and open Properties. Go to the Log On tab. Check This
account if it is not already checked and input the details for the domain
account. A restart of the SQL service is required to have it run under the new
account. This should be done on both the principal and mirror server.
The user then needs to be added to each SQL server and given sysadmin permission. This can be done from SSMS and needs to be done for both servers.
In SSMS open the database instance -> Security tab, right click the
Logins tab and select New Login...
In the General tab, input the details for the domain account into the Login
name field. Then in the Server Roles tab check sysadmin. This should be done on
both SQL servers.
With this the SQL setup will be able to proceed with the mirroring setup.
If you do not have a Windows domain server you will need to use security certificates to allow non-domain accounts access to mirroring endpoints. Essentially you are required to create a SQL Login on each server for login by the other SQL server. To this Login, a SQL User is mapped to the Master database, and that user is authorised with a security certificate generated on the opposite server. The queries in these instructions should be edited to have the correct information and checked thoroughly to ensure they are being run on the correct server and in the correct order. Fields that should be edited or checked carefully will be in bold
On the principal server edit the below query to have the correct details, double check, and then execute it on the principle SQL server.
When editing the query check the following fields which are included in
bold;
Change the default password to something more secure
Change the start date and expire date to the current date and 20 years in the
future following the format MM/DD/YYYY
Change listener port if needed
Change the file location where the certificate is saved to a directory local to
the principal server.
The query will complete and create the certificate file PRINCIPAL_cert.cer to the set folder on the principal server. Copy this file to a folder on the mirror server.
On the mirror server edit the below query to have the correct details,
double check, and then execute it on the mirror SQL server.
Edit the below query to it the same ways as the previous query.
The query will complete and create the certificate file MIRROR_cert.cer to the set folder on the mirror server. Copy this file to a folder on the principal server.
With both of the certificates copied to the other server proceed.
On the principal server edit the below query to have the correct details, double check, and then execute it on the principal SQL server.
When editing the query check the following fields which are included in
bold;
Change the users password to something more secure
Change the file destination to where the MIRROR_cert.cer is saved on the
principal server
The query will complete and the endpoint will now have the certificate assigned to it and authenticated
On the mirror server edit the below query to have the correct details, double check, and then execute it on the mirror SQL server.
When editing the query check the bold fields in the same way as the above query
The query will complete and the endpoint will now have the certificate assigned to it and authenticated. With this done on both the principal and mirror server the endpoints should now be authenticated without a domain, so the mirroring connection can be established.
On the backup server, ensure that the Patriot services are not running, and then start the Patriot Utilities program from the Windows start menu.
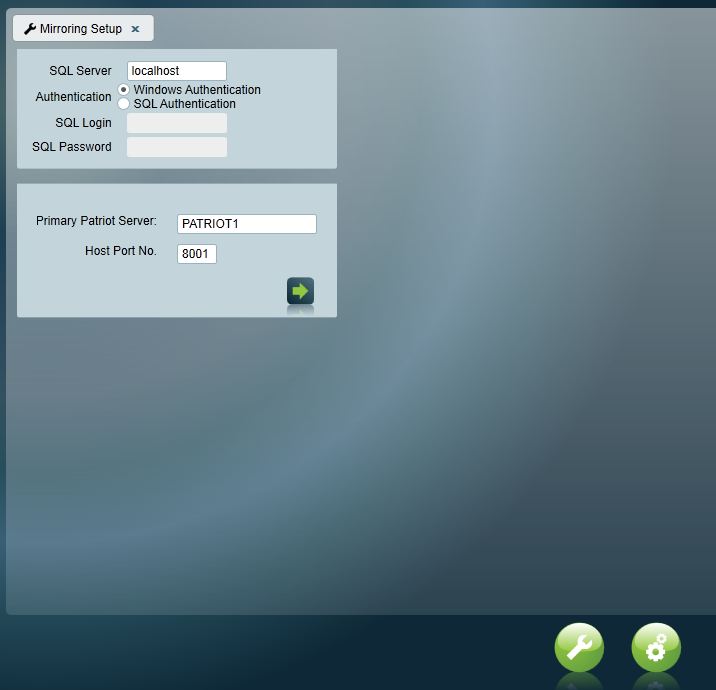
Navigate to the Mirroring setup tool: Maintenance → Database →Mirroring Setup and enter your Microsoft SQL and Patriot server details before clicking the arrow button to proceed. The SQL server details can refer to either the primary or backup instance, but the Patriot server details must be for the primary Patriot Server. The Patriot Host Port No. can be found by opening the connection settings panel from any Patriot client login screen.
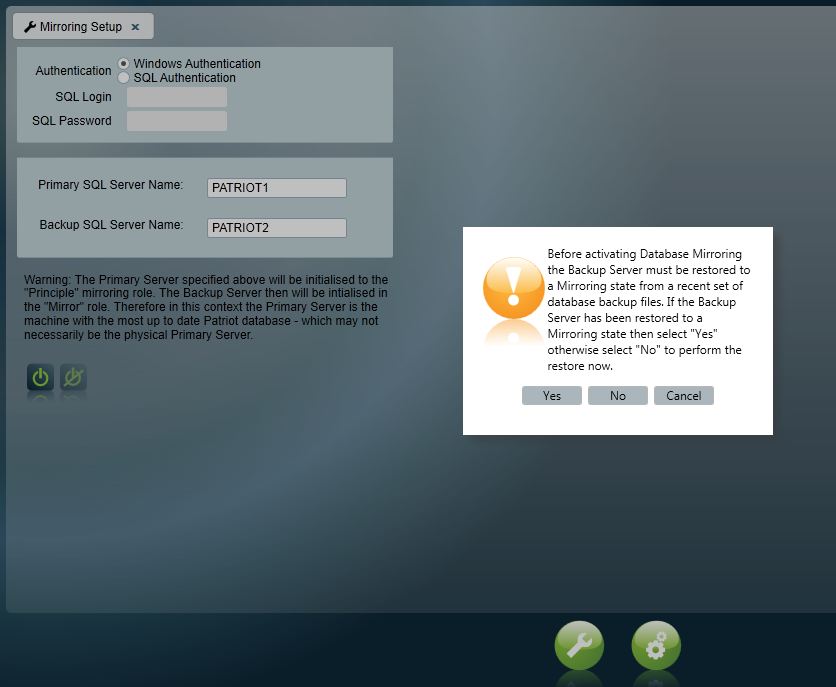
The second stage of the Mirroring Setup tool requires the names (or IP addresses) of the primary and backup MS SQL servers to be entered. The primary server must be set to the SQL server instance to which the primary Patriot server is connected. The backup SQL server (failover partner) instance may or may not have a Patriot database installed. When all form fields have been completed click the enable button to begin mirroringand a pop-up window will appear, prompting for a new primary server backup to taken, and restored for mirroring on the backup server.
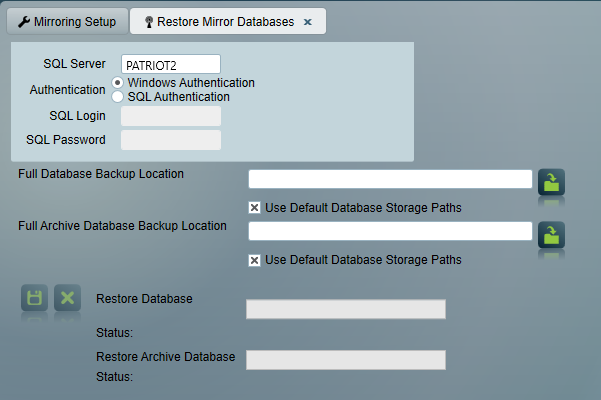
If "No" is selected at the prompt the mirror database restore tool will open. This tools requires up-to-date backup files from the primary server - see this document for information on creating a backup of Patriot's databases. The paths to the main and archive database backup .dat files must be entered into the appropriate fields on the form. Note that transaction log (.log) files must be saved in the same Windows directory as the .dat backup files in order for Patriot to detect them. Close the Restore Mirror Databases tool when the restore process completes.
Finally, to complete the database mirroring setup process, return to the Mirroring Setup tool and select "Yes."
Patriot includes a Mirroring Monitor task to help you monitor the mirroring status of the core Patriot database. This task will generate alarm events if, for example, the backup (mirror) MS SQL instance was to drop offline. It is strongly recommended that this task is setup immediately after enabling databases mirroring.
The Patriot database mirror connection is controlled with the Patriot Configurator program which can be found through the Windows start menu on a Patriot primary or backup server.
First you must open the Data Service settings and set the SQL Server and SQL Failover Server settings to match those setup in the Connecting Mirroring section. Restart the Data Service for the new settings to take effect. The Data Service will now automatically switch back and forth between the mirrored SQL instances whenever their roles change such that it is always connected to the instance in the Principle role.
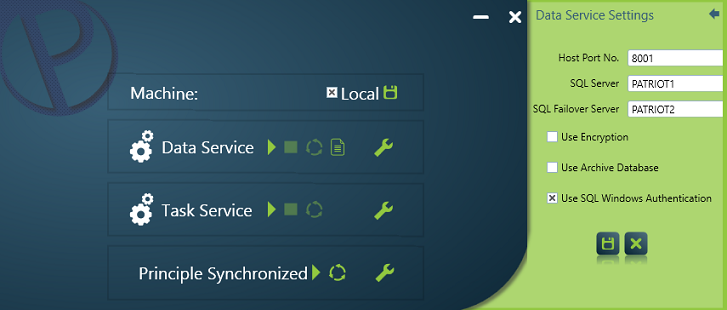
Configuring the Data Service to connect to the mirrored SQL instances.
The mirroring control tools are located beneath the Data and Task service tools. On the left side of the window, text is displayed indicating the current state of the mirroring connection (note that this indicator is not updated automatically, the "refresh" button at far right must be used to get up-to-date information). The "play" button is used to control the connection and has two functions depending on the current state of the connection:
Note: the manual failover function is only available when connected to the SQL server instance acting as the Principle, and when in the "Principle Synchronised" state.
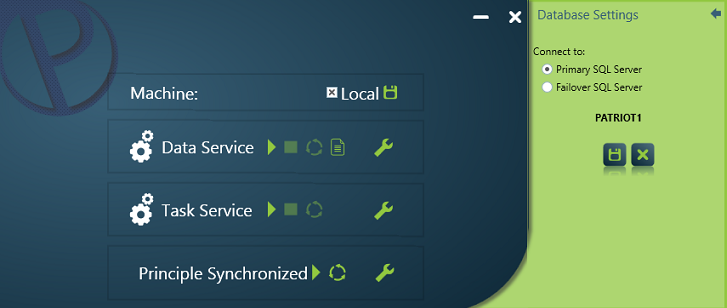
Manual Failover button is enabled when connected to a SQL instance in the "Principle Synchronised state".
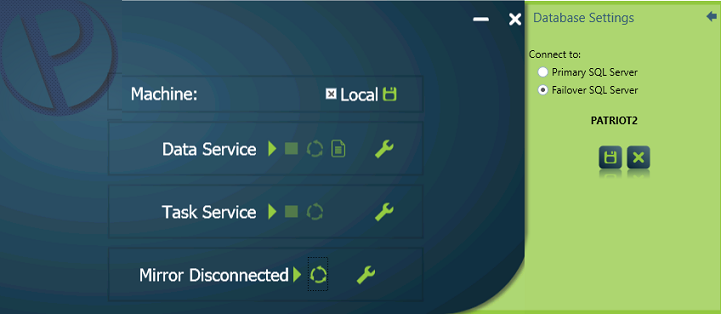
Promote to Principle button is enabled when connected to a SQL instance in the "Mirror Disconnected" state.
A Patriot database mirroring session can be de-activated with the same Mirroring Setup tool provided by the Patriot Utilities program and explained in the Setup section of this document. The de-activate button to the right of the activate button will be operational if any Patriot database mirroring connection is detected. This button should be used to disable the mirroring session - a safety confirmation window will ask for confirmation before the session is disabled. Once disabled, Patriot databases on both servers will enter an active state and neither will be automatically updated to reflect changes in the other.
Screenshot of the Patriot Utilities program Mirroring Setup tool when in the active state ready for de-activation.
"An error occurred while activating Database Mirroring..."
If a message like the above is returned after pressing the "Activate" button:
http://blogs.msdn.com/b/grahamk/archive/2008/12/11/database-mirroring-error-1443-connection-handshake-failed.aspx
http://msdn.microsoft.com/en-us/library/ms190471.aspx