These remote Arm and Disarm functions will work in both Dual Monitoring situations (sites that have a traditional alarm panel and a CCTV system) and stand-alone CCTV/DVR monitoring scenarios.
NOTE: Where the Task is configured with Event Reporting set to Arm On Status, or the client has overridden the Event Reporting setting to Arm On Status, accounts configured with CCTV settings will only log events from the DVR when the status of the account is Armed in Patriot. If the status of the client is Disarmed no events will be logged. If an account should always report events, then it should be configured with Event Reporting set to Always On. Assignable task commands for arming and disarming the DVR and Arming and disarming actions will only work for sites configured with Arm On Status Event reporting. See Event Reporting for details on this setting.
This guide has setup details for three scenarios. Instructions specific to a scenario are colour coded.
You only need to follow the colour coded steps if they are for the type of situation you are configuring.
In this scenario the recommended practice is to configure Patriot to remotely arm/disarm your DVR automatically when the associated alarm panel is set/unset. The alarm panel and the DVR are configured on different areas of the client. When the arm/disarm is received from the panel, this will trigger the DVR task to change the status of the DVR area, and also remotely change the event reporting on the DVR if possible.
Stand-alone DVR monitoring: Remote Control Buttons
For sites where there is a CCTV system but no alarm panel you can use Remote Control buttons to manually Arm and Disarm the account and the DVR if possible. Remote Controls can be manually triggered from an account at any time.
Client Reminders are another option for sites with only a CCTV system. Client reminders allow a schedule to arm and disarm the account and the DVR if possible at set times. More details can be found on the CCTV Arm / Disarm reminders tutorial page.
Note: Assignable task commands for arming and disarming the DVR will only work for sites configured with Arm On Status Event Reporting.
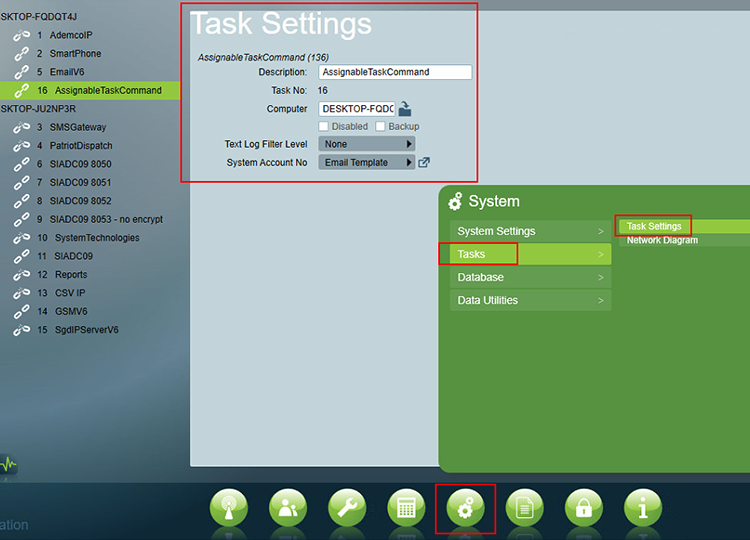
Go to the Tasks Window and create an Assignable Task Command task
You do not need to adjust any settings. Just create the task and save it.

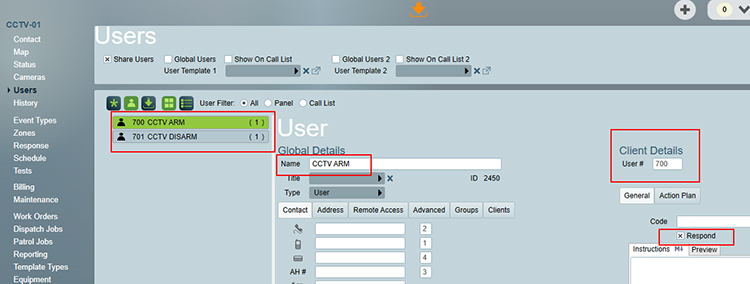
Create a new "CCTV Arm Disarm user template" and create CCTV ARM and CCTV DISARM Users. Make sure the 'Respond' checkbox is ticked as shown below. Also make sure the User # is high so it doesn't clash with any panel users. We will use 700 and 701 for our two users in this example.
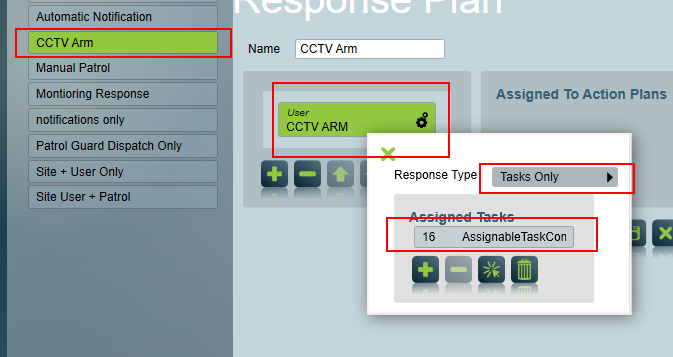
Go to the global Response Plans and add in two new Response Plans called "CCTV Arm" and "CCTV Disarm". In the "CCTV Arm" Response Plan add the ARM User that you created. Double click on the User and select the AssignableTask option. Set them to "Task Only".
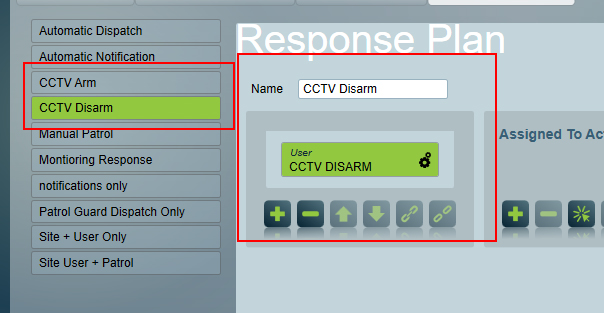
In the "CCTV Disarm" Response Plan add the DISARM User that you created. Double click on the User and select the Assignable Task option. Set them to "Task Only".
In the Users tab of the account select the CCTV User Template
Dual monitoring:
For dual monitoring setups the User Template will be added on the Panel Area of
the account.

Make sure the CCTV arm disarm Users shown up when you view all users
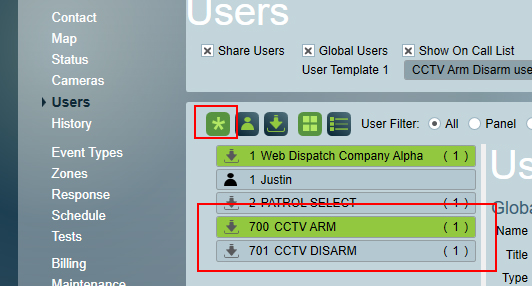
Stand Alone: Remote Control
Create an ARM and DISARM Remote Control trigger.
More details on Remote control triggers can be found in the library documentation here
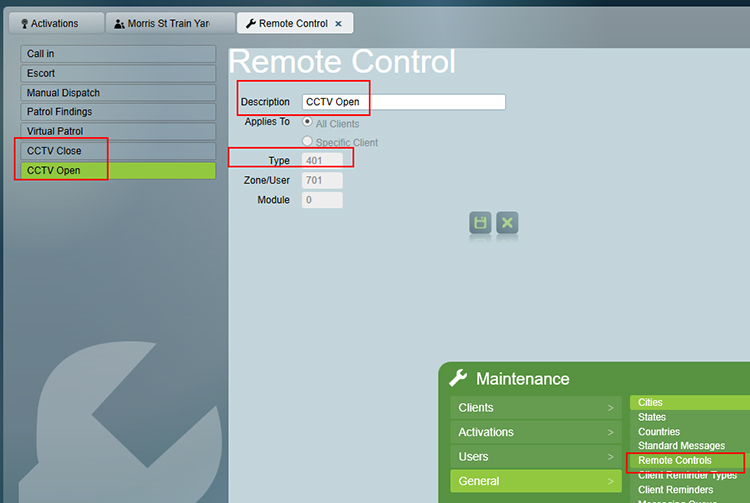
Note in the example the user numbers in the remote control settings match up with the User numbers we setup in the Global User setup at the start of this guide.
We will use Event Type numbers 1401 for arming and 401 for disarming to match the CID signal open and close events as per the instructions below.
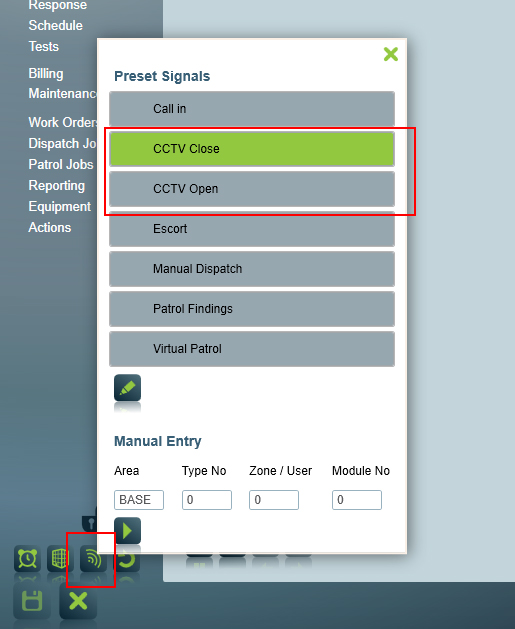
Once created the buttons should be available on the client.
Stand Alone: Reminder Schedules
Create an Arm and Disarm Reminder Type
We will use type numbers 65250 and 65251.
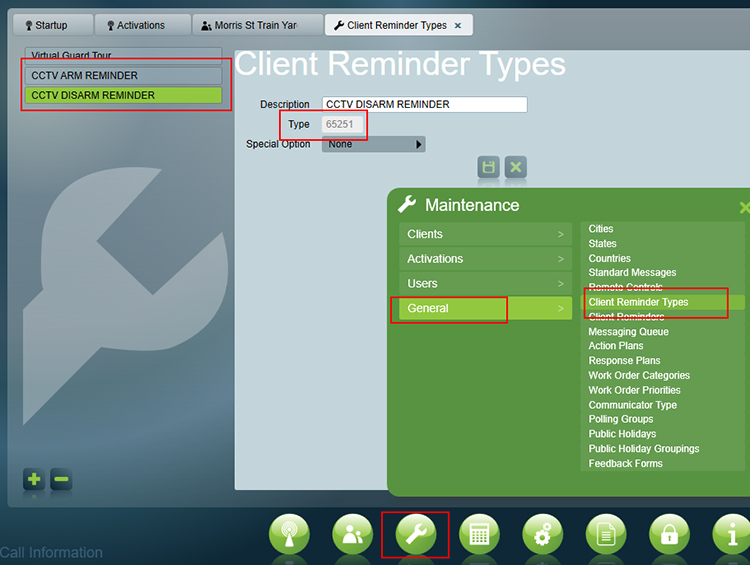
Now the reminder types are created go to the client account and create reminders for the arm and disarm schedules.
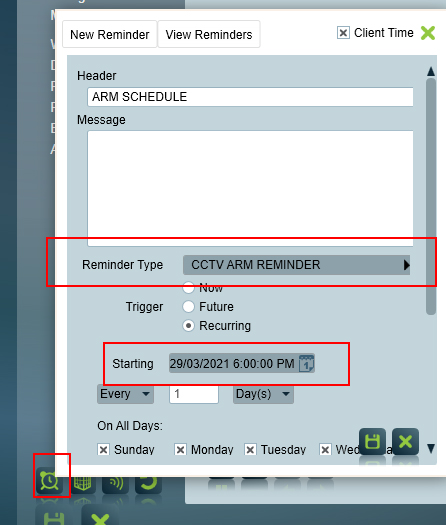

Note: when setting up the event types on the account as described in the instructions below you will need to use 65250 and 65251 as the event types instead of 401 and 1401
In the events types tab create new Arm and Disarm event types at the client level.
These new Event Types you create can have the same description and other settings as the template Event Types but they must also have instructions as detailed below.
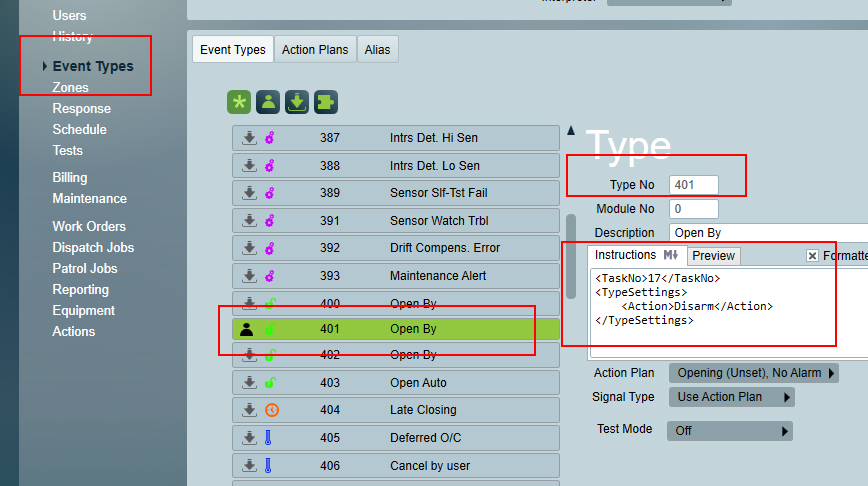
Replace the number '17' in the following examples with the Task Number used to receive events from the DVR (Task no. of the Hikvision Task, Dahua Task, Dowshu Task, etc).
Here is the demo example showing that the Dahua task is 17 which we will use as the example in this guide.

On the Event Type tab browse for all event type signals which should trigger
a remote arming of your DVR. Create duplicates of these event
types and insert the following commands into the Type Instructions field:
Dual monitoring:
For dual monitoring setups the Event Types will be added identically in on
both the Panel Area and the CCTV Area as well.
This is because when the panel reports an arm/disarm event, this will trigger the CCTV task to perform the remote arm/disarm of the DVR. It will also however log the same event type against the CCTV area so the same Event Type must exist on the CCTV area to change the CCTV area armed or disarmed status
<TaskNo>17</TaskNo>
<TypeSettings>
    <Action>Arm</Action>
</TypeSettings>
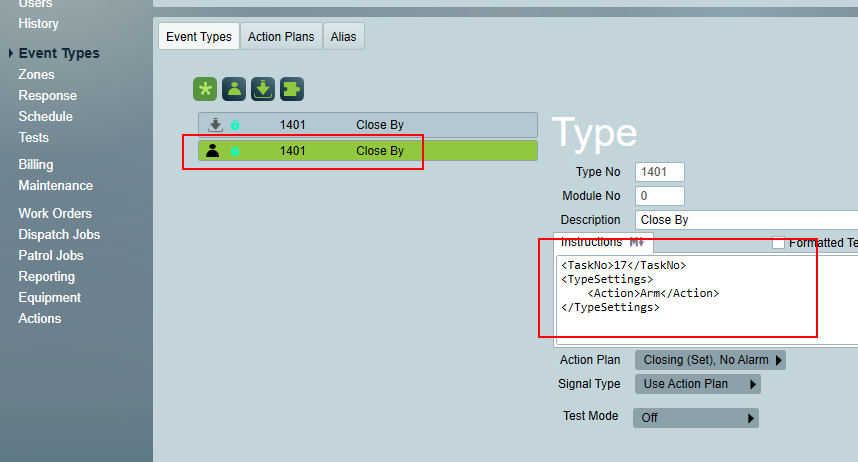
On the Event Type tab of the same account, browse for all event type signals which should trigger a remote disarming of your DVR. Duplicate these event types and insert the following commands into the Type Instructions field:
<TaskNo>17</TaskNo>
<TypeSettings>
    <Action>Disarm</Action>
</TypeSettings>

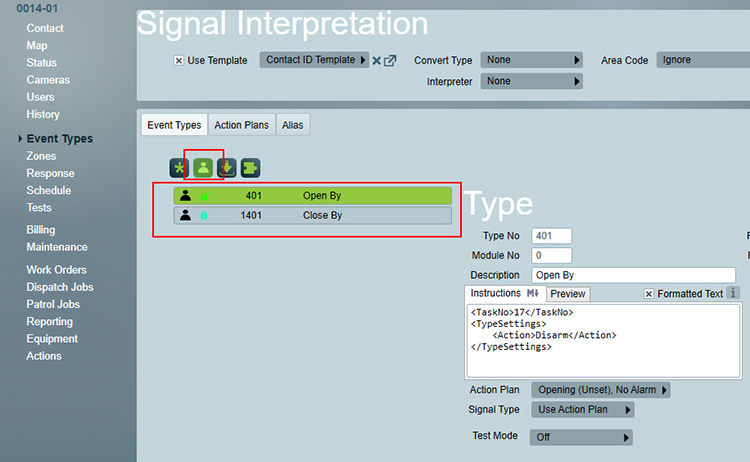
Remote DVR Arming setup step 2: the open events (401 shown) are configured to automatically disarm the associated DVR.
You should now have 2 or more client level event types for the Arm and Disarm signals with the instruction code added in.
Go to the Response Tab of the Account
Dual monitoring:
For dual monitoring setups the Response configuration above is setup on the
Panel Area of the account.
Select to view all Response Plans
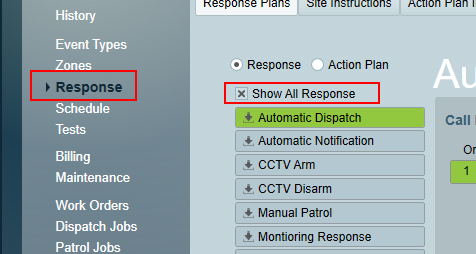
Select the CCTV Arm Response Plan and select the Action Plan that matches the Arm Event Type Action Plan
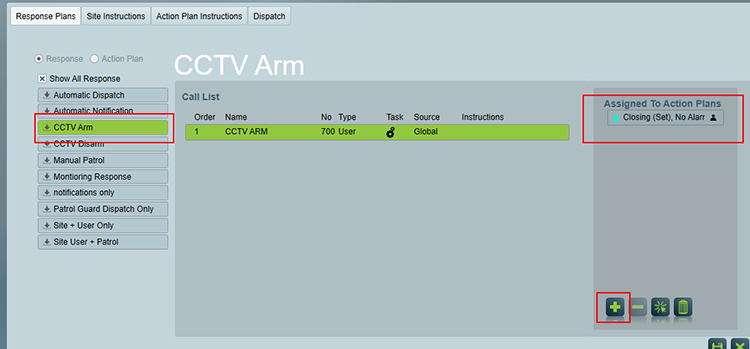
Then select the CCTV Disarm Response Plan and select the Action Plan that matches the Disarm Event Type Action Plan
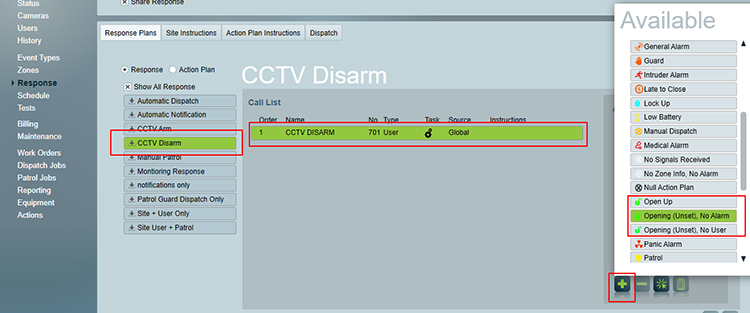
Check to make sure the ARM and DISARM Users are showing in their appropriate Response Plans and have a little cog icon showing that they will trigger the Assignable Task.

This step will make it easier to setup and use global response plans if you are going to be monitoring and using remote Arm/Disarm features for more than one Camera brand.
E.g We have Hikvision sites setup and using Remote Arm Disarm and want to add the same features for Dahua CCTV systems.
We can follow the first Global step and add in the ARM and DISARM users to the Dahua Template
However when we go to add in the User to the Response Plan we find that we would have to add in the Dahua User separate to the Hikvision.
By using User Types in the Response Plans and giving those User Types to the Dahua and Hikvision Arm/Disarm Users you can reduce maintenance and avoid having to enter separate users for separate camera systems.
Instead of setting up the Arm / Disarm Users on a unique template and adding it to each account you can use the Global User Template. The Global User Template is defined in the systemwide settings and will add Users in that template automatically to every account on your system.
Instead of adding in the event types on every client you can potentially update the Dahua, Hikvision, CID templates or any other template directly. This will avoid having to setup new event types on every account. This will work as long as the instructions didn't show during response or they would interfere with operations.
To quickly enter Event Types into a client with instructions you can have a Template with all the Event Types with instructions setup to copy them from. Then when setting up a new account that needs arm / disarm capabilities you can similarly choose to copy the Event Types in quickly from the pre-set template.
The steps below should help you find at what stage the Remote Arm disarm feature is failing and narrow down any issues.
REMEMBER: An account configured with CCTV settings will only log events from the DVR when the status of the account is Armed in Patriot. If the status of the client is Disarmed no events will be logged.
Load up the Assignable Task Diagnostics
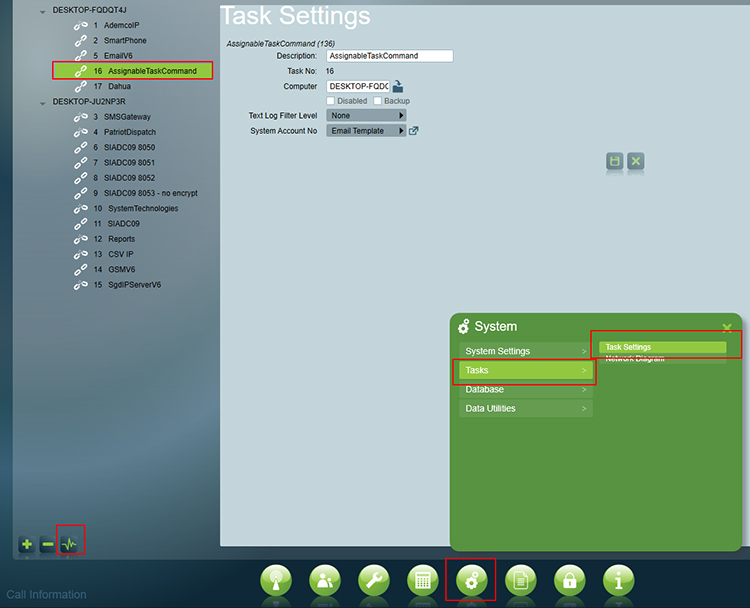
Send through the event that should trigger the remote arm / disarm and check the Assignable task diagnostics.
Here is an example of what you should see in the assignable task diagnostics. If this is appearing but you are getting events when the CCTV system should have been disarmed then check the diagnostics of the CCTV task.
If you don't see details logged like the example below then the issue will be the triggering of the Assignable task. Recheck the User, Event Type and Response Plan settings making sure each step will trigger the next.
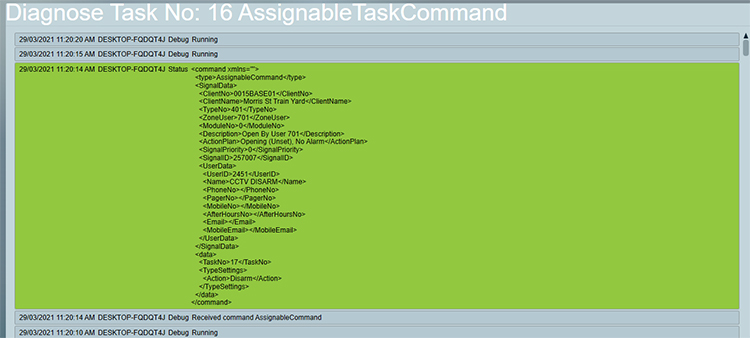
Once the Assignable task is shown to have been triggered you can check the CCTV task diagnostics should then show the attempt to arm and disarm the DVR.
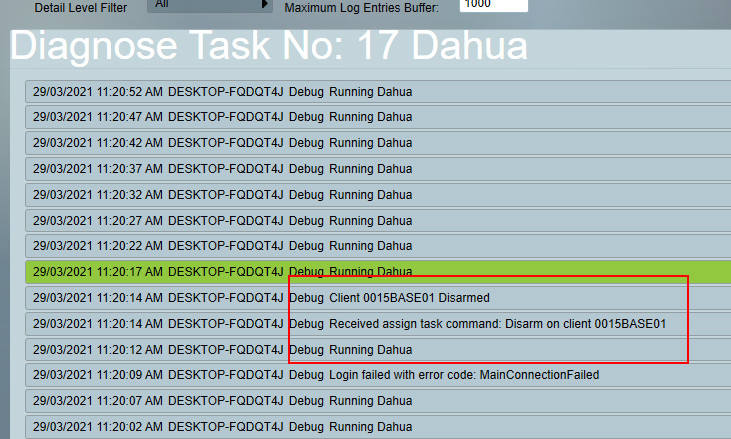
The outcome should be that the A: the CCTV diagnostics shows the arm / disarm of the CCTV system as show in the image above. B: the site area status updates.
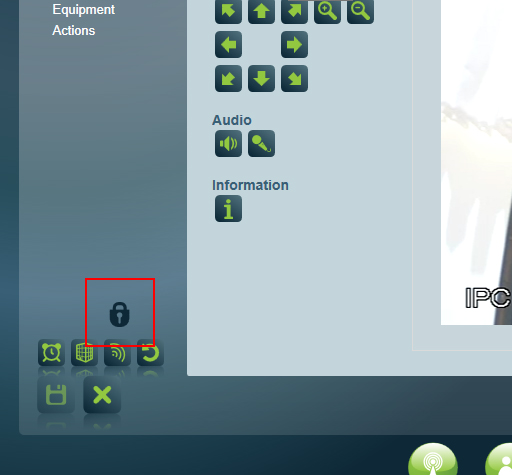
The result is that signals will not be received in Patriot while the site is disarmed.
Some CCTV systems have security rights for Users regarding the ability to arm and disarm the signals being sent. You may need to update the Users security rights in the DVR/Camera system that you entered in Patriot for access.